You Test the Tamping Mat, WDT, and Distributor — See the Truth
Why these tools matter to your espresso
You chase a better shot. You try many things. The tamping mat, the WDT tool, and the distribution tool often sit on the bench. They change how your puck behaves. This intro tells you why to test them. It sets a clear goal. You will learn how to judge each tool. You will learn what to keep and what to drop.
You want even flow. You want steady shots. Parts inside the portafilter decide this. Tools are small. Their effects can be large. But tools can also lie. They can cost time and money.
This article shows simple tests. You will see real gains. You will make choices. Test and keep what works.

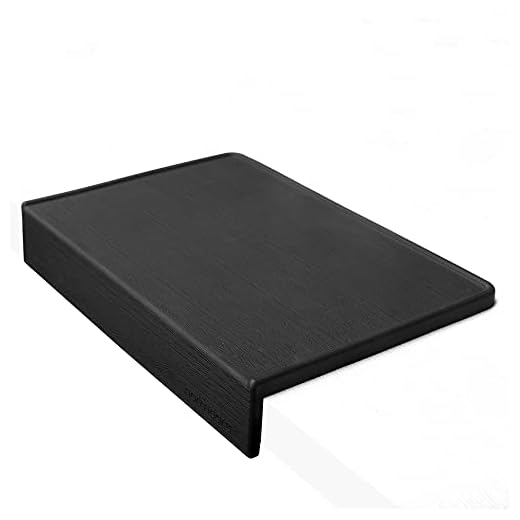

Meticulous Tamping Station: Precision for Perfect Espresso
Set the test. Define what you want from a puck
Decide your aim
You must plan. Pick one or two clear targets. Do you want even flow? Less channeling? Faster dial-in? Pick one. Keep the rest steady. If you chase two goals, they should not conflict. Write the aim at the top of your notes.
Lock the constants
Run the same beans. Use the same dose. Keep grind and machine settings fixed. Use the same basket and portafilter. If you are not testing tamp technique, use a consistent tamping force. Train that force on a scale or use a calibrated tamper such as an Espro Calibrated Tamper. Aim for the same number every time — 20–30 lb is common — and hit it the same way.
Choose simple metrics
Simple metrics win. Pick what you will measure before you brew.
Write these down. Take a photo of the puck and a short clip of the pour. A single image tells you more than memory.
Run enough shots
Short tests tell less. Run at least three repeat shots per setup. Average the numbers. If one shot looks odd, flag it. Small changes matter. A 0.5 g shift in yield or a 3–5 second change in time is worth noting.
Keep your notes usable
Use a simple table or notebook. Date, aim, constants, tweak, and results. Be strict. If you change the grind, reset the test. If you replace a gasket, reset the test. Compare like with like.
Real-world tip
If you want faster dial-in, time matters. You can spend an hour testing a distribution tool and get no clarity if you also tweak grind each shot. You will save time by locking the basics and running repeats.
Next, you will apply this plan to the tamping mat. You will test stability, feel, and whether it gives you practical gains at the bench.
Tamping mat test: stability, feel, and practical gains
You test the mat first. It anchors the portafilter. It protects the bench. It also changes how you tamp. Set up the mat. Lock the portafilter. Tamp as you always do. Do not change your force or motion yet. That is the point.
How to run the mat test
Place the mat. Lock the portafilter. Take three tamp strokes as your normal routine. Note how the basket moves under load. Repeat with the same dose and grind. Swap mats if you can. Try a firm rubber pad, a soft silicone pad, and a thin leather or cork pad. One clear run per mat. Record time, yield, and a photo of the puck.
What to feel and watch for
A good mat stops unwanted motion. You want steady resistance under the palm. If the basket rolls or shifts, the tamp will vary. A soft mat can let the portafilter tilt. A very hard mat can lock the portafilter but transmit shock to the bench.
Look for these signs after tamp:
If you see a smear, you likely moved the tamper on release. If you see cracks, the tamp may have been uneven. Write this down.
Pull shots and compare
Pull at least three shots per mat. Note extraction time and flow pattern. Take a short video of the pour. Taste for balance and clarity. Does crema form faster? Is the flow steady or does it surge?
Small changes matter. A 3–5 second shift in time is real. A more even pour and tighter range of times mean the mat helped. If shots vary the same as before, the mat only gave comfort.
Durability and grip
Check how the mat holds up after a few days. Does it stay put? Does it tear? Does it pick up coffee oil and smell? A mat that slips under wet hands will cost you consistency. A heavy rubber mat that never budges is often the best choice for steady force.
Do not confuse soft, nice-feeling rubber with better results. The winner is the mat that makes your tamp more repeatable. Keep the routine simple. Note which mats made your tamp steady. Keep using that one.
Next, you will test a tool designed to fix the puck itself: the WDT.
WDT tool test: break clumps, tame fines, and speed your dial-in
You test the Weiss Distribution Technique tool next. The WDT combs the grounds. It breaks clumps. It frees fines. Your aim is even density before tamp. You want fewer instant gushes and a calmer, steadier pour.
Why use WDT
Clumps hide fines. Fines pack fast and channel. The WDT loosens them. That makes the puck more uniform. If your grinder throws lots of static or clumps, WDT often changes the whole shot. If your grinder is consistent and coarse, WDT may change little.
How to run this test
Load the basket as you always do. Seat the portafilter. Use a tool with several thin needles—common models include the JRD WDT tool (7–16 needles) or the Orphan Espresso-style comb. Hold the tool vertical.
Do one run with WDT. Do one run without. Keep all other variables the same: dose, grind, tamp force, water temp. Pull three shots per method.
What to watch in the shot
Watch the pour from the first second. A WDT-treated puck should:
Record time, flow, and a short video. Taste side-by-side. A cleaner, brighter cup after WDT signals success.
When it helps — and when it doesn’t
WDT helps when clumps and fines drive uneven density. It often rescues shots that once gushed in the first five seconds. It also speeds dialing by making changes reproducible.
WDT adds 10–20 seconds. Most find that time pays back in easier dial-in. If your grinder is well tuned, with low fines and even distribution, the tool may not move the needle.
Tips and common mistakes
Keep motions small. Do not agitate the bed into a froth. Avoid over-aeration. Use the WDT to calm clumps, not to remold the dose. Needles bent or wide-set can drag. Replace them if they snag.
Run the test across several doses. Look for repeatability. The next test will see if a dedicated distributor can push this further by aligning and spinning the bed.
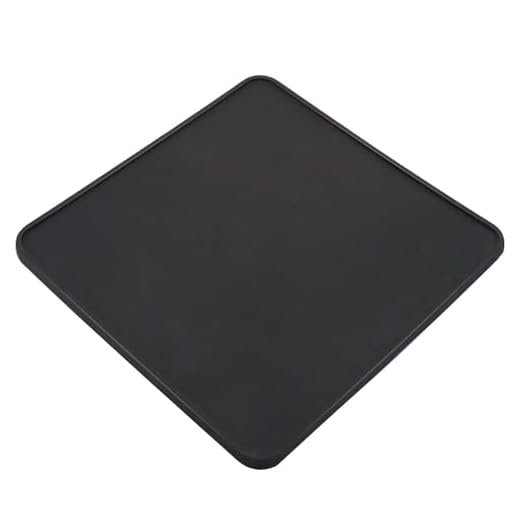
Distribution tool test: alignment, spin, and the combo test
You test distribution tools last. They shave and level. They set the puck before you tamp. You want to see what they truly add. You want one puck that pours the same way each time.
What to look for
Check the surface first. It should be flat and even. Watch how the edge looks. A clean rim hints at steady flow. A ring of fines at the edge hints at over-compaction.
Measure these things for each tool:
The three styles and how to test them
Flat disc: press it across the bed. Use a light twist. You want a level plane. Brands: Pullman-style flat distributors. They are simple. They often speed tamping.
Spin tool: set it on the puck and spin. The spin aligns particles. The Orphan Espresso OCD is a well-known example. Spin tools often move fines to the edge. That can help or hurt. Watch the first few seconds of the pour.
Calibrated depth tool: it sets a fixed depth. It gives repeatable headspace. Use it when dose volume varies slightly. It pairs well with a consistent tamp.

How to run each test:
Use a phone to film the pour. Small changes show up on video.
Combo tests — order matters
Try these combos:
Run three shots for each combo. Compare times and taste.
Real-world notes and tips
If your grinder throws a wide spread of particle sizes, a distributor will not fix the core problem. It will mask it at best. If your grinder is tight and clean, these tools make small gains clear. In a busy cafe, you want the combo that gives the most repeatable cup with the fewest steps.
You may find a spin tool tames a stubborn grinder. Or you may find WDT then a flat disc makes dialing a breeze. Keep the workflow simple. Watch the clock. Watch the cup.
Now that you have the data and a feel for each tool, move to the final section for clear rules and a few simple choices.
Clear rules and simple choices
You tested. You saw what worked. Keep tools that make shots steadier. Drop gear that only feels good and slows you. Favor small steps and few moves. Tune one thing at a time. Make the puck repeatable. Trust tests, not trends.
Your bench should hold only what helps. Clean gear. Learn the feel. Measure again. Repeat. Share what you learn with others. Brew better. Keep your list short, honest, and used daily.
 Previous Post
 Next Post
Question for anyone who tried the Walnut Espresso Stirrer with Five Fine Needles: how’s the cleanup after WDT? Grounds everywhere? I’ve heard needles can fling fines if you’re too vigorous.
I just tap the portafilter lightly into the knock box and brush the needles off. Not a huge issue if you’re careful.
Good question. If you move the stirrer gently and keep it vertical, mess is minimal. Faster, aggressive agitation can fling fines, so technique matters as much as the tool.
Okay, I’m that guy who mixes sarcasm and coffee: so the waffle iron for coffee grounds is out, right? 😂
Jokes aside: I tried the 8×8 heavy-duty mat and the Compact 8×6 one. For heavy tamping (I use a 58mm tamper) the 8×8 is basically a fortress. Also bought the Nessus 10-Needle kit — it’s like a tiny rake of doom for clumps. My shots tightened up after a week. Thanks for the tests!
Haha waffle iron = nope. Marcus, the 58mm + heavy mat combo is what the pros would high-five.
Rake of doom — perfect phrase. Also, be careful with needle bend if you’re mixing heavy-handedness with metal needles.
Appreciate the humor — and glad the Nessus helped. The article noted that more needles can speed things up but also change the feel of the WDT.
Worth mentioning: wooden stirrers are a bit more forgiving on accidental drops; metal needles can bend but are easier to realign if not snapped.
Yup — dropped once, fixed with pliers. Still works but now it’s characterful.
Anyone else had bent needles in the Nessus? Mine survived lots of use but a drop on tile did one in 😩
Nice write-up — loved the combo test section. I’ve been bouncing between the 8×8 heavy-duty silicone tamper mat and the compact 8×6 one. The stability bit really nailed it: the heavy-duty mat feels like it arrests wobble better, but the compact one’s nice if you’re short on counter space.
Also tried a Walnut Espresso Stirrer with Five Fine Needles once — clump-buster for sure. Curious if anyone mixed the 10-needle Nessus with the smaller mat? Seems like overkill but maybe faster for dialing in.
Agree on the tactile feedback point — the walnut stirrer feels more… precise? The wood needle gives small resistance so you can feel where fines are hiding.
Thanks Ethan — glad that combo test resonated. People do pair the Nessus 10-Needle with the smaller mats; it speeds up breaking clumps but you lose a tiny bit of tactile feedback compared to fewer needles.
I use the compact mat at home and the 10-needle on Saturdays when friends come over. Overkill? Maybe. But it shaves a minute off dialing in for 4+ shots, so worth it for me.
Fun article! The tamping mat test felt relatable. My two cents: ergonomics matter. If your mat makes your wrist weird, you’ll develop a bad tamping habit. The slot mat was easier on my wrist.
Thanks for practical takeaways.
Good point on ergonomics — we emphasized feel as well as stability. Wrist comfort can affect consistency over long runs.
I have some thoughts after doing my own side-by-side. Long post because I love this nerdy stuff:
1) Tamping mat: I tried the Food-Grade Silicone Espresso Tamping Mat with Slot and the 8×8 heavy-duty one. The slot mat is great if you want tamp-and-go without picking up the tamper; the heavy-duty is better for heavy, even force.
2) WDT: Tried the Walnut Espresso Stirrer and a cheap 3-needle. The walnut felt sturdier and the five needles are a sweet spot — breaks clumps without making a mess.
3) Distributor vs spin: The distributor helped a little when my grind was inconsistent. Spin-based distributors are fun, but alignment matters more than I realized.
Worth noting: if you’re already consistent with your grind and dosing, the gains are smaller. But if you’re inconsistent, these tools are massive QoL improvements. 🙂
Great summary, Jordan. Agree on the diminishing returns when your base technique/grind is already dialed. The article tried to highlight that (clear rules & simple choices).
Anyone tried the Nessus 10-Needle + walnut stirrer back-to-back? Wondering if mixing WDT styles helps.
Also worth mentioning: water temp and dose still matter more than any distributor. Don’t blame the tool for a bad grind.
Totally — once grind is stable the distribution tool is like icing on the cake. Before that it’s more like a bandaid.
This. I inverted that order when I started and wasted $$$ on gadgets. Get the grinder right first.
Neutral take: if you’re a beginner, buy one mat (preferably the heavy-duty 8×8) and one WDT tool (5-needle or 10-needle depending on speed needs). Don’t buy every gadget at once.
The article’s ‘clear rules and simple choices’ section is gold — it stopped me from getting every shiny distributor I saw on Amazon.
Sensible approach. Simplicity helps prevent tool overload and builds technique first.
This. Start minimal, then add tools to solve specific, repeatable problems.
Short and sweet: WDT tools changed my life. Those tiny needles really tame fines and make the puck more uniform. The article’s WDT test was thorough.
Full disclosure: I’m lazy and mostly care about speed. The Nessus 10-Needle bought me that speed and the time savings are real. BUT — if you want the absolute best single-shot extraction for competitions, I think slower, precise WDT with fewer needles + a good tamp mat is still king.
So, choose for your workflow.
Yes! Match the tool to the day. Competition = precise, cafe = fast and consistent.
Perfect summary — match tool choice to workflow. Competitions vs cafe throughput are different beasts.
Quick note: the Food-Grade Silicone Espresso Tamping Mat with Slot is surprisingly useful if you do a lot of back-to-back shots. The slot helps place the portafilter repeatedly in the same spot and saves time. Also it’s less messy on the bar.
Yep — consistency in portafilter placement is underrated. The slot mat can remove a small variable that otherwise creeps into tamp angle/placement.
Also prevents scratches on your counter. Small wins.
Good tip — I used to eyeball placement and that tiny drift was adding variance. Slot mat fixed that for me.
Long rant incoming because I care too much about my espresso:
– I tried to shortcut everything and bought the Nessus first. It improved speed but not my taste initially.
– Switched to a Food-Grade Silicone Espresso Tamping Mat with Slot and focused on consistent dose and tamping angle for two weeks — shots improved massively.
– Reintroduced the Walnut Espresso Stirrer and used it gently. Now everything clicks.
So yeah, tools are helpers, not magic. The tests in the article reflect that real-world progression.
Love the process you described — it’s exactly the learning curve many go through. Tools amplify what you already do well.
Beautifully said. The sequence matters.
Claire, what grinder do you use? Curious if that was a missing piece for you too.
Sounds like my early days. The slot mat is underrated for consistency.
This is one of those articles that makes you want to re-evaluate your whole setup. A few quick notes from me:
– The Compact 8×6 Inch Silicone Espresso Tamper Mat is cute and space-saving but move to the 8×8 if you ever use a distribution tool or heavier tamp.
– The Walnut Espresso Stirrer is lovely but treat it like a tool you hand-wash and protect from moisture if it’s actual wood.
– The Nessus 10-Needle kit is excellent for speed but less forgiving technique-wise.
Also, typo in the combo test subtitle? Might be just me spotting things late 😅
Thanks for the practical tips and for spotting that — appreciate the eagle eye! We’ll double-check the subtitle.
About the mat sizes: storage space and tamp technique both factor. I keep two mats and rotate depending on task.
Agree on hand-wash for wood — mine warped slightly after a long soaking once.
Yup, wood needs TLC. I oil mine occasionally to keep it in shape.
Good catch on the typo — glad it’s not just me being pedantic!
I tried the distributor’s spin method and honestly felt like I was doing pottery instead of making espresso. 😅
Alignment actually made the biggest difference for me, like the article said. If your distributor is off even slightly, your puck is uneven. Using a mat that anchors things helped.
Loved the ‘Set the test’ section. Defining what you want from a puck before buying tools saved me from impulse purchases. My follow-up: do you think the walnut stirrer vs nessus debate is more a budget vs speed question?
Exactly — walnut/5-needle is great for precision on a budget; Nessus 10-needle is for speed and larger throughput. Both valid depending on priorities.
For home use I’d pick walnut. For a small shop or events, Nessus makes more sense.