Command Your Manual Espresso Machine
Start with the Machine, Start with You
You want control. You want a good shot and a quiet ritual. A manual espresso machine gives both. It puts work in your hands. It asks for focus. It rewards skill. You will learn the parts and the moves. You will learn to read the cup.
This guide shows what to expect. It shows the tools, the grind, the tamp and the steam. It teaches fault finding and care. It gives a plan you can follow. Practice builds skill. Start small. Measure. Taste. Repeat. Keep notes and be patient. You will get better every week with deliberate practice and clear goals daily.


Brewing Coffee the Human Way: A Hands-On Guide
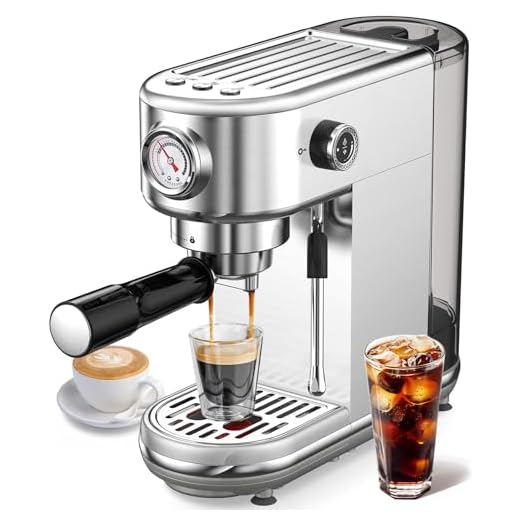
Know Your Manual Espresso Machine
You must know the tool. Learn the main parts. See how they link. Know the limits. This knowledge will save you time and grief when a shot goes bad.
The key parts and the flow
Know these by heart:
Water runs from the tank or line to the pump, into the boiler, through the group, and into your cup. Steam leaves from the boiler to the wand. When you trace that path, faults become obvious.
Models and what they teach
A lever machine like the La Pavoni shows you pressure with your arm. A boutique pump machine like the Rancilio Silvia teaches you about PID and heat control. A prosumer dual-boiler (Rocket, ECM) gives quick steam and stable temps. A compact home machine (Gaggia Classic) teaches you patience with single-boiler limits.
Read the signs: gauges, lights, and sounds
Watch the pressure gauge during a pull. Learn normal ranges for your machine. Note the heat-ready light and what it means. Listen to the pump: a steady hum is good. A sputter or loud clack means air or low water. A stiff or loose lever tells you about seals and oil.
Quick checks you can do now
These skills let you spot leaks, clogged baskets, or a tired pump fast. Next, you will pick the right tools and coffee to match your machine.
Choose the Right Tools and Coffee
Tools that make shots repeatable
Good shots need good tools. You want gear that gives the same result every time. Start small. Build up.
Choose and store beans
Buy beans with a roast date. Fresh coffee peaks two to four weeks after roast for many roasts. Look for single-origin and blends. Single-origin shows a clear fruit or chocolate note. Blends hide flaws and add balance. Taste both. Keep notes.
Store beans whole. Use an opaque, airtight container. Keep them cool and dark. Do not refrigerate. Grind right before you brew. The scent fades fast once ground.
Water and where to spend
Use filtered water. Bad water will ruin a fine grind and a good puck. Aim for balanced mineral content. Too soft tastes flat. Too hard scales your boiler.
Spend where it matters. Replace the cheapest weak link first. A better grinder will change your shots more than a pricier machine. A good grinder beats a better machine. If you must choose, buy a better grinder.
Quick, practical tips
Keep it simple. Test one change at a time. Track what you taste.
Master Grind, Dose, and Tamp
Grind for espresso
Grind sets the battle. It controls flow and flavor. Too coarse and the water rushes through. Too fine and the puck chokes. Start coarse. Pull a shot. Watch the stream. Adjust one notch finer. Pull again. Repeat.
Aim for a steady, dark honey flow. Learn the feel of a good grind. Small grinders change a lot with one click. Big commercial steppers need smaller moves. Note the time and taste every change.
Dose by weight
Weigh your dry coffee. Do not guess. The grams you put in shape everything. A common start is 18–20 g in for a double. Aim for about 36–40 g out. That is a 1:2 yield. Use the same dose every shot.
Weigh the puck on the portafilter before tamping. Track dose, yield, and time in a note. Use numbers, not memory. Over days you will see patterns. Your coffee will tell you what to tweak.
Tamp like a pro
Distribute the grounds so the bed sits flat. Press straight down. Use even force. Hold the tamper steady. Do not rock. Keep the rim clean. If grounds stick, wipe them away.
Try a firm, single press. About 20–30 lb of force works for most people. Use a calibrated tamper if you want exact repeatability. The goal is a uniform puck, not a showy twist.
Read and adjust
Make one change at a time. Change grind, not dose and tamp together. Pull a shot. Note the flow, time, and taste. If the shot runs too fast, go finer. If it chokes and drips, go coarser or drop a gram.
Train your hands. Repeat the same prep until the movement is muscle. Consistency will give you the biggest gains. Keep a log. You will learn the language of flow and flavor.
Pull the Shot Like a Pro
Preheat and flush
Heat matters. Warm the group head and portafilter. Drop the empty basket in and run water for a few seconds. That flushes old water and raises temp. On a Silvia, you may need a longer flush. On a Linea Mini, a quick flush will do.
Lock in and start
Lock the portafilter tight. Place your cup on the scale. Tare. Start the shot and the timer at the same moment. Use an Acaia Pearl or the Mini USB-C Rechargeable Espresso Scale with Timer if you want fast feedback.
Watch the flow
Look at the stream. It should start slow. Then it should turn thick and honey-like. Watch color. It should go from dark to a lighter caramel. Watch speed. Aim for a yield and time you chose—many begin with 1:2 in about 25–35 seconds.
Key flow cues:
Stop and taste
Stop at your target weight or time. Taste the shot plain. Note acidity, body, and bitterness. Does it taste thin? Tighten the grind or raise the dose by a gram. Is it bitter or harsh? Loosen the grind or shave a few seconds off extraction. Change only one thing at a time.
Keep notes and tweak
Write down dose, grind setting, yield, time, and a quick taste note. You will see patterns. One click on a grinder can change time by several seconds. Small, steady tweaks beat wild swings. Over days you will build a routine that yields steady shots.
Next you will take that blank cup and add steamed milk with care.
Steam Milk with Care and Purpose
Purge and position
Purge the wand first. Let a short blast clear water. You want dry steam. Place the tip just below the milk surface. Angle the pitcher so the tip kisses the side. Keep a small whirlpool started.
Stretch for microfoam
Lower the tip a hair as foam builds. You want a steady hiss. That hiss tells you you are stretching. Add air only for a few seconds. Stop when the milk looks glossy and small bubbles form. Big bubbles mean you added too much air. Aim for silk, not foam-candy.

Dive to heat and texture
Now dive the tip deeper to heat. Keep the whirlpool. The milk will warm fast. Watch the pitcher neck and listen. A fine, even roll is your cue. Heat to about body-warm. You can use a thermometer. Or learn the hand test: stop when the pitcher is just too hot to hold.
Tap, swirl, and polish
Tap the pitcher on the counter. Knock out any large bubbles. Swirl to merge foam and liquid. The surface should look like wet paint. Polish until the milk shines. This gives you control when you pour.
Pour with intent
Match milk to the shot. Whole milk gives weight. Lower-fat milk gives clarity. Oat adds sweetness and foam. Pour steady. Start high to sink the milk. Move close to lift design. Keep the wrist calm. Try a heart or a simple rosetta first. Practice the motion. Know when to stop. Milk can hide a weak shot. It can also lift a great one. Use foam to refine the cup, not to hide flaws.
Key cues and quick tips:
Maintain Your Machine and Solve Common Faults
Daily care keeps you ahead
Care keeps the machine honest. Backflush daily if your group has a three-way valve. Use a blind filter and a small scoop of cleaner. Run short pump cycles. Rinse well. Wipe the group, portafilter, baskets, and steam tip after each use. Purge the wand and wipe it clean.

Deep clean and descale
Descale when your water report or taste tells you to. Hard water needs more often. Follow the maker’s steps. Use the cleaner they recommend. Empty and refill reservoirs. Flush lines after descaling. Many home machines like the Rancilio Silvia or ECM need careful rinse cycles. La Marzocco home models have service guides—read them.
Replace wear parts early
Gaskets and screens wear. Replace gaskets when you see leaks or a poor seal. Change shower screens and group seals if flow looks uneven. A worn gasket makes a fast, thin shot. A new gasket often fixes it.
Quick troubleshooting
Log it and act
Keep a simple log. Date, symptom, remedy, part changed. A one-line note saved me a service call. Small fixes now stop big repairs later. Fix the hiss. Tighten the leak. Replace the gasket. The machine will thank you.
Now move with that care into the ritual you build around the machine.
Make It Your Ritual
You now have the map. Practice the steps. Keep your rig clean. Taste with purpose. Be patient. Skill grows with small, steady work. Command your machine. Make better coffee. Enjoy the work and the cup.
Turn this into a ritual. Set a time. Make one shot at a time. Learn one small change each week. Note what you do. Trust your senses. Fix faults fast. Oil the hinges. Purge the steam. Replace parts when they fail. Share a cup. Teach a friend. Keep this simple. Build the habit. In time your hand will steady. Your coffee will sing. Return to these pages when you need a nudge. Keep learning. Drink slowly and smile again, and often.
 Previous Post
 Next Post
Great article, but quick rant: the little frother on some 20-bar machines sputters and makes a mess. 😑 I expected better. The ‘Steam Milk with Care and Purpose’ tips were useful though — helped me not scald milk every time.
Sorry about the sputtering — often caused by trapped air or mineral build-up in the frother. Try purging and running some Cafiza solution through (as per maintenance instructions). If it’s still bad, the wand tip might need replacing.
Okay, scalding hot takes incoming: the built-in frother on cheap 20-bar machines (I own a CASABREWS 20-Bar Compact Espresso Machine with Frother) is fine for lattes, but if you want silky microfoam you NEED a proper steam wand or practice like crazy.
I used the Stainless Steel Milk Frothing Pitcher with Pen and watched my milk go from meh to cafe-level after a week of trying. Also the article’s bit about stretching milk first then introducing air was super helpful.
But the sarcasm: if you expect latte art on day 3, you’re dreaming. 😂
Totally — built-in frothers are convenient but limited. Good point on the pitcher: the shape matters for pouring. Practicing with your pitcher and using lower temperatures (58-62°C / 136-144°F) for stretching then finishing at ~65°C helps form good microfoam.
I found adding a tiny splash of cold milk to warm up the pitcher (pre-warm) made the first shots more consistent. Kinda hacky but worked for me.
Quick tip: if your machine’s frother creates big bubbles, try purging it, then position the tip just below the surface and angle the pitcher so milk spins in a whirlpool — that usually collapses big bubbles into finer microfoam.
Olivia you nailed it. I tried using the frother from a High-Pressure 20-Bar Espresso Machine and it took forever to get decent texture. Practice + cooler milk temp = better outcome. Also, foaming pitchers with thinner spouts help for latte art.
Long comment because I got nerdy with the maintenance section — forgive me. I followed the ‘Maintain Your Machine and Solve Common Faults’ steps to the letter, bought Urnex Cafiza Professional Espresso Cleaning Powder 566g, and scheduled a monthly backflush. Also descaled using the machine’s recommended solution.
Result: fewer temperature swings and more predictably tasting shots. I’m now a convert — spending 10 minutes a week on maintenance saves me loads of wasted beans.
One practical question: how often should I replace the group head gasket? The article said ‘when worn’ but I’m not sure how to spot subtle wear without disassembling everything.
I replaced mine annually — it’s a 10-min job on my model and totally worth the tiny cost. There’s a YouTube clip for my exact machine that made it easy.
Fantastic — maintenance pays off big. For group head gaskets, look for these signs: leaking around the handle during extraction, uneven tamping feel (wobbly portafilter), or visible cracks. Many users check every 6-12 months depending on usage. If you’re using the machine daily, lean towards 6 months.
Priya, also if your machine’s shot pressure readings are inconsistent, that’s another sign the gasket is failing. If you don’t want to disassemble, take a close look at the seating when the portafilter is locked in — any gaps are a red flag.
Adding: keep an extra gasket on hand if you use the machine a lot. It’s a cheap spare that prevents long downtime.
Thanks all — that’s super helpful. I’ll inspect more regularly and keep a spare gasket in the coffee drawer 😅
This piece makes me want to buy every accessory listed. The Complete 25-Piece kit + Stainless Steel Milk Frothing Pitcher with Pen = tempting. Also lol at my first attempts: looked like coffee and foam at war. 😆
Tiny request: could you add price ranges for the products? Makes planning easier.
Good point, Liam — we’ll consider adding price ranges or links to typical retail listings in the next revision to help budgeting.
Pro tip: look for bundle deals — sometimes machines like the CASABREWS come with tamper kits or pitchers included and it’s cheaper than buying separately.
Love this guide — finally something that treats the espresso machine like a partner, not a magic box. I bought the Mini USB-C Rechargeable Espresso Scale with Timer after reading the ‘Master Grind, Dose, and Tamp’ section and it actually helped me stop over-dosing.
A few things that worked for me:
– Start with a consistent dose (I settled on 18g) and the scale made it repeatable.
– Using the Complete 25-Piece Espresso Tamper and Latte Kit improved my tamp consistency — night-and-day difference.
One question: anyone else had trouble with crema when using a compact 20-bar machine like the CASABREWS? My crema is thin but flavor is ok. Any tips on adjusting grind or dose?
I had the same issue with my High-Pressure 20-Bar Espresso Machine. Tighter grind + slightly more dose (0.5-1g) helped me. Also check water temp if your machine lets you — higher temp = better crema most times.
Samantha — also try cleaning the group head and portafilter with Cafiza (Urnex Cafiza Professional). Old oils gunk up puck contact and can kill crema. I run a backflush every week and that made a huge diff.
Great to hear the scale helped, Samantha. Thin crema on compact machines is often about grind and freshness — try tightening the grind slightly and checking your beans’ roast date. Also make sure your tamp is level and firm; the Complete 25-Piece kit is great for practice. If you can, preheat the portafilter and keep extraction times around 25-30s as a starting point.
Major improvement since I followed the ‘Master Grind, Dose, and Tamp’ and ‘Pull the Shot Like a Pro’ sections.
I started using the Complete 25-Piece Espresso Tamper and Latte Kit and a Mini USB-C Rechargeable Espresso Scale with Timer. Now my shots are way more consistent.
Also — I’m obsessed with rituals now. I do a 90-second warm-up, grind, wipe, tamp, pull, steam, and 60-sec tidy. Makes the morning feel intentional.
Tiny complaint: the article mentions ‘Choose the Right Tools and Coffee’ but doesn’t list where to find a good entry-level burr grinder. Anyone have recs?
Thanks for the suggestion, Oliver. We’ll consider adding a ‘Grinder recommendations’ sidebar with price tiers and why each is good.