How to Froth Milk Without a Machine: 6 Quick Steps You Can Do
Make Great Milk Foam Without a Machine
You can make rich foam with no machine. In 30 seconds, milk can double in volume when frothed. Use simple tools and six quick moves. Save money. Drink better coffee at home. No skills needed. You will love the results.
What You Need
4 Easy Ways to Froth & Foam Milk Without an Espresso Machine
Pick the Right Milk
Whole wins. But plant milks can surprise you. Which will you choose?Pick milk that makes foam. Whole milk gives thick, creamy foam. Low-fat yields light, airy foam. Oat and soy froth well. Almond can be weak.
Read the label for added oil or sugar. Try a few kinds. Note which milk makes the foam you want for your coffee.

Heat the Milk Just Right
Heat kills foam. But cold milk hides the taste. What is the sweet spot?Warm your milk gently. Aim for 55–65°C (130–150°F).
Heat on low in a small pan. Or microwave in 15–20 second bursts. Stir between heat cycles. Keep the milk moving to avoid hot spots.
Stop at the sweet spot. Too hot will break the foam.

Shake It in a Jar
No tools? No problem. Shake like you mean it and get cloud foam.Pour warm milk into a jar.
Fill one third of the jar.
Screw the lid tight.
Shake hard.
Move your arm fast in short strokes.
Shake for 30 to 60 seconds.
Stop and check for foam.
Check: foam will rise and cling to the sides.
Tap the jar gently to settle large bubbles.
Pour slowly into your drink.
Use a spoon to hold back foam if you want more control.
Try a 60-second shake when you need dense foam for a quick home latte.
Whisk or Use a Hand Frother
Small tools. Big change. Which tool wins your kitchen?Use a wire whisk or an electric hand frother.
Whisk fast in an M motion.
Create air and lift the milk.
Use short, quick strokes near the surface.
Move the frother up and down with a steady hand.
Froth until the milk is thick and glossy.
Heat the milk first for better body.
Whisk about 20–40 seconds for a latte.
Froth 15–25 seconds with a hand frother for quick foam.
Finish with a few taps to smooth the foam.
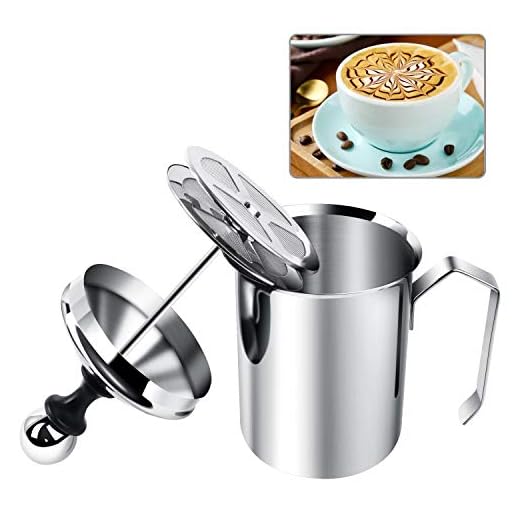
Pump with a French Press
Own a press? Turn it into a frother. It works like a charm.Pour warm milk into the French press.
Fill to half.
Plunge up and down fast.
Use strong, steady strokes.
Aim for 20–40 pumps; about 30 pumps works well for one latte.
Watch the milk thicken and rise.
The mesh traps air and makes foam.
Let the foam rest for 10–20 seconds to set.
Scoop the foam with a spoon or pour gently for latte art.

Finish, Pour, and Clean
The last move makes the drink. Clean now. Do not wait.Tap the container on the counter to pop big bubbles. Tap twice. Hear the pop.
Swirl the milk to blend foam and liquid. Swirl for 3–5 seconds.
Tilt your cup and pour slow. Pour from 3–4 inches for a steady stream. Hold back foam with a spoon to layer. Let it flow for simple latte art if you pour faster from higher.

You Are Ready
You can make lovely foam in minutes. Use heat and air. Practice one method. Then refine your touch. Pour slow. Sip and savor. Clean quickly. Keep trying. Your hands learn. Ready to make coffee that lifts your morning?
 Previous Post
 Next Post
Loved the cleanup tip at the end. I always dread milky residue in my tools. Scrubbing right away actually works. Anyone uses dishwasher-safe frothers?
My cheap frother goes in the top rack and is fine. But I remove the battery first haha.
Most handheld frothers with removable heads are dishwasher-safe; always check the manufacturer instructions. For jars and french presses, pre-rinsing helps a lot before dishwashing.
Quick tip: using skim milk makes way more foam but it’s airy and disappears fast. If you want fluffy for photos, go skim; for creamy sips, whole milk rules.
Exactly — skim traps more air because of lower fat, but the bubbles are larger and less stable. Great distinction!
Yep, skim foam is like a cloud that melts in 10 seconds. I learned that the hard way 😂
Long-ish review: Followed the whole guide step-by-step, used oat milk and a hand frother. Results:
– Smooth microfoam that lasted a few minutes
– Clean-up was fast since I rinsed immediately
– My latte art looks amateur but it’s improving
Thank you for making the steps clear — the ‘You Are Ready’ part actually made me feel accomplished lol.
Practice + patience = better art. Also, use a small pitcher if you want more control pouring.
Love hearing this, Grace! Small wins like that matter. Keep practicing with gentle swirling to improve latte art.
Tried the jar-shake method this morning — wow! Froth was pretty decent for latte art practice (not perfect, but good enough). I used whole milk and heated to about 140°F like the guide said. Thanks!
Great to hear, Ellen! Whole milk usually gives the best stability for foam. If you want tighter microfoam, try whisking right after shaking for 10–15 seconds.
Nice! I always underheat my milk and get meh foam. What jar size did you use?
I used a pint glass jar with the lid — fits enough milk for one mug. Works well 👍
Hand frother = my life now. Cheap, fast, and way less arm exercise than shaking. Anyone else use a battery one vs electric?
Battery frothers are convenient and portable. Electric ones are a bit more powerful and consistent if you froth a lot.
I have a battery one — lasts months and is easier to clean. No complaints.
Loved the step about ‘Finish, Pour, and Clean’ — so simple yet important. One silly thing: I always forget to clean the thermometer and it ends up sticky. Anyone else?
Oh good idea — designated cup it is. Thanks!
Also towel-dry everything so water spots don’t form on stainless tools.
You’re not alone! A quick rinse right after use prevents sticky build-up. If it dries, warm soapy water usually does the trick.
I’ve learned to keep a designated cup for tools. Saves time and keeps counters cleaner.
Tried oat milk (barista version) and it frothed like a dream with the whisk. Plant milks have come a long way — surprised me.
Oat barista blends are formulated to froth better — they usually have added stabilizers for that reason. Glad it worked well for you!
Same. Coconut milk is hit-or-miss, though. Oat wins for latte texture imo.
If anyone’s vegan and wants creamy foam, try barista oat + whisk. Game changer.
Long post: I followed all 6 steps yesterday and made a couple of mistakes so sharing so others don’t repeat them.
– I overheated the milk (oops) and it tasted slightly burnt
– I used a tiny jar so it overflowed when shaking
– I didn’t pour the milk through a spoon and lost most foam directly into the cup
What I changed today:
– heated to 140°F exactly
– used a larger jar and only filled 1/3
– poured foam last with a spoon — much better results
Hope this helps someone — trial and error is part of it!
Appreciate the list! I always forget the spoon trick and end up with lattes that look sad.
Thanks for the detailed write-up, Maya — super helpful. Your pour method (foam last with spoon) is exactly recommended for preserving the foam layer.
Burnt milk is the worst. I use a thermometer so I don’t guess temps anymore.
If you don’t have a thermometer, aim for warm but not scalding — test with your wrist like when warming a baby bottle: comfortably warm, not hot.
Totally relate to the tiny jar mistake. 😅 Lesson learned.
Okay long story: I tried the french press pumping method after failing at shaking (my arms gave up). Here’s what happened:
1) Heated milk to about 150°F (prob a bit high)
2) Poured into my 12oz french press, pumped ~20 times
3) Foam looked good but had big bubbles
4) Poured gently and most foam sank in the cup after a minute
Any advice on getting smaller bubbles and longer-lasting foam? Should I lower the temp or pump less? Also, is it worth using a hand frother instead? Thanks!
Try pre-warming the glass/cup too. Cold cup kills foam 🙃
Also swirl the milk in the press gently after pumping to break down big bubbles. That helped me a lot!
Lower the temperature to ~140°F and try fewer, firmer pumps — say 8–12 instead of 20. Over-pumping introduces larger bubbles. A hand frother usually makes finer microfoam faster if you prefer that texture.
Bonus: for plant milks, oat with barista label tends to give smaller, more stable bubbles. Almond can be tricky.
I had the same problem. Now I heat to 135–140°F and do quick 10 pumps. Also let it sit 10–15 seconds before pouring so the foam stabilizes.
Question: can you combine methods? Like pump a bit with french press then finish with hand frother? I’m curious if mixing gives a better foam.
I do this sometimes — french press for volume, frother for texture. Works well.
Also remember to pour milk first then foam last if you want a clear foam layer on top.
That combo saved my lazy mornings. Faster than whisking and more control than press alone.
Yes, you can combine methods. A few pumps in the french press to incorporate air, then quick bursts with a hand frother can refine bubble size. Just avoid overworking the milk.
Careful with timing — do the frother immediately after pumping otherwise the foam structure collapses.
I tried whisking with a balloon whisk — took longer but I like the texture. PSA: if you’re in a rush, whisking is slower than frother but cheaper.
Also, don’t forget to warm your cup. I used a cold mug once and it ruined my foam. Rookie move.
Heh rookie moves unite. I microwave my cup for 15 seconds now. Instant upgrade.
Microwave trick is solid. Also saves the coffee from getting cold too fast.
Balloon whisks do take longer but can give good control — and yeah, pre-warming the cup is an underrated step.
Does anyone else find shaking in a jar actually kinda fun? Feels like a low-effort workout. 😂
But real question: how full should the jar be? The guide says don’t overfill but no exact amount.
Leave about half the jar empty so there’s room for the milk to expand while shaking. Around 1/3 to 1/2 full is a good rule of thumb.
Also use a jar with a tight seal. I learned the ‘shower curtain incident’ so now I double-check the lid 😂
I fill mine to the shoulder of a mason jar — gives plenty of air space and no spills.
Good call on the tight seal. I almost made a mess once too.
Small nitpick: the guide says to ‘heat just right’ but doesn’t give a Celsius equivalent. For those using metric, 140°F ≈ 60°C — that helps. Loved the whole guide though!
Thanks for pointing that out, Priya — good catch. We’ll add the Celsius conversions in an update: 140°F ≈ 60°C and 150°F ≈ 65°C.
Another tip: milk scalds at around 180°F/82°C, so staying below that keeps flavor intact.
Yesss please add metric! I always do the math in my head and forget. 😉
Glad that helps. Also, if you don’t have a thermometer, look for ‘feels hot but not scalding’ as a quick check.