Steam, Gauge, Pour: You Nail Milk Every Time
Steam, Gauge, Pour — Nail It Every Time
You want good milk. You want it every time. This guide gives you the tools. It cuts through the noise. It shows clear moves. You learn how the milk jug, the thermometer, and the steaming pitcher work together.
You learn the small shifts. You learn how to make foam silk. You learn how to pour clean. The steps are simple. The practice is steady. The results are worth it. Follow the moves. Nail your milk.
Read on. Learn the feel. Tune your tools. Steady hands make steady milk. You can do this now.


Perfect Milk Steaming for Latte Art: Avoid Common Mistakes and Achieve Silky, Pour-Ready Texture
Know Your Tools: Jug, Pitcher, Thermometer
The jug and its lip
Pick a milk jug that guides the stream. The spout must be true. A wide, blunt lip throws a fat stream. A thin, precise lip gives line work. Hold each jug. Feel the balance. Pour from arm height. Pour from elbow height. See how the flow changes.
A barista I know swapped a cheap jug for a Rattleware 12 oz. The lines tightened. Mistakes fell by half. You will notice the same when the lip matches your hand.
Pitcher fit and feel
Choose a steaming pitcher that fits your wand and your cup. Too big and you lose control. Too small and you spill. Look at the shape. Round bellies help whirl the milk. Narrow spouts help draw hearts.
Test these models in real life: Motta 18 oz for medium cups. Rattleware 20 oz for all-around use. The weight matters. Heavy steel steadies your hand. Light steel lets you move fast. Learn both.
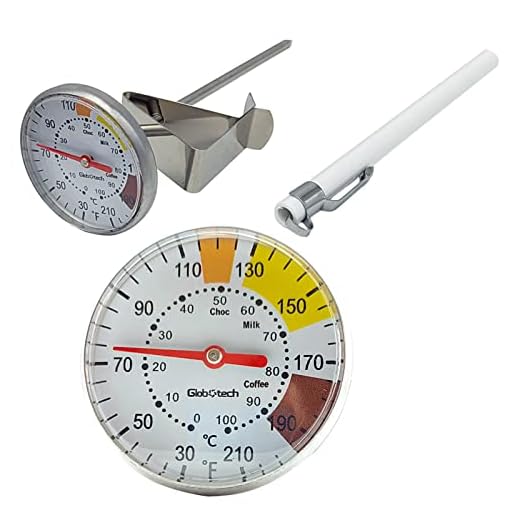
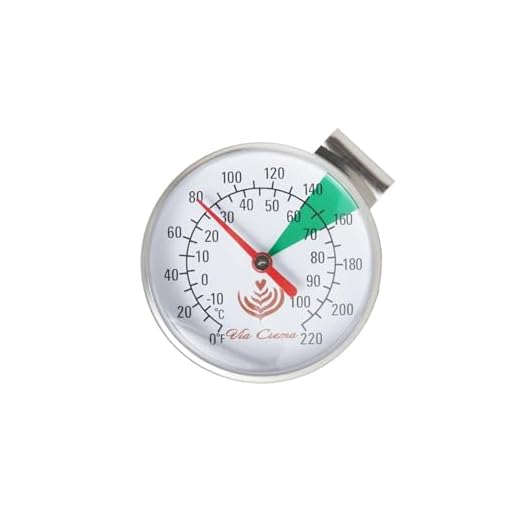
Thermometer: fast and true
Get a thermometer that reads fast. You want a snap answer. Thermapen ONE and Lavatools Javelin give quick, clear readings. Clip it so the probe touches milk, not the pitcher wall. Hold it at an angle if you must. Readings off the wall will lie to you.
Aim for repeatable points. Note how long a 0.5°C rise takes for each pitcher. That tells you how the tool behaves.
Quick checks to pair them
Run these simple tests before you steam:
What to expect
You build a kit that feels like an extension of your hand. The right spout, the right weight, the right probe cut fault down fast. Next you learn to read heat. The thermometer will become your anchor in the next step.
Gauge Temperature: The Thermometer Is Your Anchor
Stop guessing. Measure.
You must stop guessing. Use the milk thermometer on every shot. Trust the read. Let it guide your hands. You will waste less milk. You will keep the taste.
Find the sweet zone
Aim for a range, not a number. These work in real cafés:
These are safe, repeatable spots. Mark them in your head. Repeat them until they are muscle memory.
Read fast. Read low.
Keep the probe below the milk surface. Not at the lip. Not on the pitcher wall. Let the tip sit in the flow near the center. Read often. A one‑second lag can hide a spike.
Use fast thermometers. They tell you the moment heat finishes. If your read lags, you will overcook.
Heat in steady strokes
Don’t blast heat. Move the pitcher to keep a whirl. Hold the wand steady. Let the milk spin. The temperature will climb in a steady line. If it jumps, reset. Keep strokes small. Breathe. Count to ten if you must.
Look and listen
Your eyes help the probe. Watch the milk. It will shine and tighten. Your ears help too. The loud hiss at start will soften into a thin, steady hum when microfoam forms. When the sound changes and the thermometer nears your target, prepare to stop.
Know the fail signs
Too cool and the foam will be thin. Too hot and the milk will taste flat or break. If you see large bubbles or smell scorched milk, you are past the sweet spot. Stop sooner next time.
You will learn the rhythm. The thermometer will catch the finish. Use it. Then you will have texture, taste, and no wasted milk. Next, we put heat into motion and shape that texture with the wand.
Steam for Texture: Pitcher Position and Wand Work
Hold the pitcher right
Grip low. Your thumb braces the handle. Your fingers cup the base. The pitcher must not wobble. Lean it slightly. Aim the lip at the grinder. Small, solid moves win.
Set the wand tip
Place the tip just below the surface. Not buried. Not out in the air. You want a soft hiss. If it screams, pull up. If it gurgles, sink a hair. Keep the tip at the side of the pitcher where the milk can spin.
Make a whirlpool
Angle the pitcher to form a steady vortex. Let the milk turn. The flow folds air into the liquid. Keep the steam moving the whole time. If the whirlpool dies, adjust the tilt. If it over-rolls, slow the wand. You want a smooth, glassy spin.
Short climbs, then sink
Use short climbs at the start. Lift the tip to nick the surface. Count one, two. Add small amounts of air. Then sink the tip deeper. Let the whirl heat and polish the foam. Don’t chase volume. Build density first, then sheen.
Watch and feel
Look for a glossy mirror on top. Feel the heat through the metal. The pitcher will grow warm in your palm. When it tightens, you are near done. Stop when the thermometer says so. Your hands will tell you before your head does.
Tame big bubbles
Tap the pitcher on the counter. Then swirl to fold big bubbles into the mass. If large pockets persist, give a short burst of steam at low angle to collapse them. Finish with a calm whirl to meld the texture.
Know the pitcher’s voice
Pitchers talk. A narrow lip whispers control for fine pours. A wide base shouts room for stretching milk. Try a 12 oz Motta for single shots. Use a 20 oz Rattleware for doubles and more rolling. Learn the feel of each. Your hands will learn the moves faster than your head.
Pour Like You Mean It: Spout, Angle, and Flow
Set your stance
Grip the jug steady. Your thumb and forefinger hold the rim. Your wrist stays loose. Plant your elbow. Move from the shoulder. Small, steady moves beat frantic flicks. Tilt the cup toward the stream. Let gravity help.
Start thin, sink the crema
Get the spout close to the cup. Start with a thin stream. Pour from a bit of height first. The higher pour sinks the crema and sets the base. Then lower the jug as the cup fills. The stream will thicken. Match height to flow to avoid splashes.
Use the spout to guide the line
The spout draws the line for you. A narrow spout makes tight lines and sharp hearts. A wider spout fills space fast and makes broad designs. Match your pour to the cup size and the design you want. For a 6 oz cup go narrow. For a 12 oz cup go wider.

Move and wiggle
When the cup is half full, bring the jug closer. Keep the stream thin. Use a small, steady wiggle to lay patterns. Push with the shoulder. Keep your wrist soft. The wiggle is small. It places the white ribbon. Slow your motion as you finish.
Control with pressure and height
Control flow with two levers: pressure and height. Raise the jug to thin the stream. Lower to thicken it. Use more pressure for faster fills. Back off pressure for detail work. Watch the milk ribbon. If it breaks, raise up or ease pressure.
Quick do’s and don’ts
You will practice this until it feels simple. In the next part, you’ll learn how cleaning and small tweaks keep every pour consistent.
Care and Tuning: Clean, Adjust, Repeat
Clean right away
You must clean right after each steam. Purge the wand for 3–5 seconds. Wipe the wand with a damp cloth while it is hot. Then soak the tip if milk has dried. A short soak lifts film. Dry the pitcher between uses. Metal holds heat. A dry pitcher warms more predictably.

Daily checks that save time
Do a quick thermometer check once a week. Fill a glass with crushed ice and a splash of water. The probe should read 0°C (32°F). If it doesn’t, re-zero or replace it. Watch seals and tips. They wear. Replace rubber seals and steam tips when you see cracks or leaks. A small leak steals steam power and texture.
Troubleshoot one fault at a time
Note small faults. Fix one at a time. Too much air? Stop the roll-out sooner. Late stop? Watch the temperature and lift the pitcher at 54–60°C (130–140°F). Wrong angle? Reset your wrist and stance. Keep a calm list. Change one variable per session. That way you know what worked.
Adjust your technique
Alter your grip, your tilt, your milk temp. Try small moves. Record the change. For example: “thumb high, 45° tilt, 56°C — smoother microfoam.” Try the opposite in the next short session. You will see which move made the milk better.
Keep honest notes and short practice runs
Carry a small notebook or use a notes app. Write the brew, the milk, the temp, the change. Practice in short bursts. Ten minutes a day beats a scattered hour. You build memory. You catch drift. Clean gear and clear notes speed your progress.
Next, you will take these habits and apply them in service. The final section shows how to make the move.
Make the Move
You have the steps. You have the tools. Steam with intent. Gauge with the thermometer. Pour with the spout. Clean and tune. Do this often. Your milk will improve. Your pours will speak for you.
Start today. Practice. Fail fast. Learn fast. Repeat. Trust the heat. Trust the feel. Keep the wand clean. Adjust as you go. Let your hands do the work. Let your pours tell the story. Share your pours with friends and keep improving.
 Previous Post
 Next Post
Minor critique: the thermometer recommendations are good, but there are cheaper dial thermometers that read fast enough. The Stainless Milk Frothing Thermometer for Pitchers mentioned is nice, but not the only route. Accuracy vs cost trade-off could use a tiny chart or something.
Agree with Daniel — I started with a cheap dial and upgraded when I got serious about latte art. Both do the job, depends on how picky you are.
Fair point — we tried to list a few options (from pricier stainless to budget picks) but I can add a quick note on pros/cons of dial vs probe thermometers.
Question: for non-dairy (almond/soy/oat), does the thermometer target temp change? The article talks about the Thermometer Is Your Anchor, but I can’t tell if the temps listed are for cow milk only. I don’t want curdled drinks or flat foam. 😬
Great question. Non-dairy milks generally foam best at slightly lower temps — many baristas aim for 130–140°F depending on the brand. Oat often tolerates a bit more heat than almond.
I froth oat milk at ~140°F and it’s usually silky. Almond/soy I keep around 135°F. Use the thermometer and experiment 5°F at a time.
Please do — would love to hear what works for the brand you use.
Thanks everyone! Will test with the VIA CREMA thermometer and report back 🙌
Some non-dairy types separate when too hot. Watch for too many big bubbles — that’s a sign to lower temp.
Long comment because I love steps:
1) Pre-chill the pitcher a bit so it’s not piping hot when you start.
2) Steam to around 145°F for whole milk (I use the Stainless Milk Frothing Thermometer for Pitchers). Hold pitcher at a slight tilt and keep the wand near the side to swirl.
3) Tap and swirl to remove bubbles. Pour steady — start high for base, lower for art. The Stainless Milk Frothing Pitcher with Art Pen helped my lines be more deliberate.
I used to just wing it; following these made my milk consistent. Also, a tiny scald burns the milk and ruins sweetness — watch that temp!
I disagree on pre-chilling for every situation — sometimes you want the pitcher warm to keep the milk moving. Context matters.
@Marcus Reed fair — I meant slight chill, like room temp not fridge-cold. But good point about keeping milk movable.
Great step-by-step, Ava. Pre-chilling the pitcher is a tip a lot of people skip but it’s so useful.
Short and sweet: this article made my pours smoother. Paying attention to spout + angle actually changed everything. Used my De’Longhi jug for the first time with intentional pouring and it felt right.
Awesome — consistency beats trick shots. Glad the De’Longhi did the trick!
Which spout do you have? Narrow spout helps a ton for latte art.
Reading ‘Make the Move’ made me try a latte art pour in the kitchen at 2am. My roommate yelled, but I nailed a rosetta on my third try. Practice makes reckless confidence 😂
Love this. 2am pours are oddly productive — just try not to wake anyone with the steam wand noise.
Happened to me too. Midnight practice is the best teacher. Also coffee at that hour = bravery.
Not a fan of the Normcore Handleless Milk Pitcher for Latte Art — looks sleek but slips right out of my hand when it’s wet. Article mentions different pitchers but maybe add a note about grip/ergonomics? Handleless is a style win but function lost imo.
I swapped to a pitcher with a small lip and it helped. Handleless looks cool but I prefer a handle when doing multiple drinks.
You can wrap a thin silicone band around the pitcher for grip — not elegant but works.
@Sophia Lee ya handles are safer. I wish Normcore offered a textured finish.
Thanks for the feedback — ergonomics are definitely important. We can add a note comparing handle vs handleless for slip risk and personal preference.
The Zulay wand is loud but satisfying. It’s like someone cheering my milk into existence. 😂 Also, pro tip: the stand keeps my tiny counter organized.
Agreed about the noise. My cat hates it but my crema looks happier.
Ha — the sound does feel motivational. Glad the stand is useful!
Tried the Zulay Cordless Milk Frother Wand last weekend — wild little gadget. Great for single cups but man, if you overdo the angle it splashes everywhere. lol
Yep, angle + depth = less chaos. Also keep the whisk just below the surface when starting and then raise slowly for texture.
Glad you gave it a spin! The wand is awesome for quick jobs. Try a slightly shallower angle and lower in the jug to reduce splatter.
Cleaning section was clutch. I have the Stainless Milk Frothing Pitcher with Art Pen and the little pen tip gets gunked fast. Any pro tips for keeping that nib clean without dismantling everything every time? Also — are there cleaning solutions that won’t hurt the stainless?
@Liam O’Connor oh nice, I’ll try the vinegar soak. Never thought to do that — thanks!
For the art pen, rinse immediately after use and run warm water through the pen tip. A small brush (soft nylon) helps. Mild dish soap is fine for stainless; avoid bleach or harsh abrasives.
I soak the pen parts in a 1:10 vinegar:water mix for 10 mins if it’s grimy, then rinse well. Works every time for me.
Love the “Gauge Temperature” bit — seriously, the thermometer is the unsung hero. I started using the VIA CREMA Milk Frother Thermometer Jug after reading this and it made temp control way less guessy. Quick question: do you guys let the milk cool a tad before pouring latte art? I feel like the art holds better if it’s not scalding.
Nice tip, Jordan. Also worth noting: pitchers heat up as you steam, so account for that when you read the thermometer.
I’ve found 140–150°F is my sweet spot for whole milk. For oat I go closer to 135°F. VIA CREMA saved me from over-steaming ☕️
Totally agree — let it sit for about 10–15 seconds if you’re aiming for finer lines. That tiny drop in temperature helps surface tension for microfoam like the article suggests.
Curious about jug sizes and thermometer types. The article recommends the De’Longhi Stainless Milk Frothing Jug 12oz — is that strictly for single drinks? And how does the VIA CREMA Milk Frother Thermometer Jug compare to the Stainless Milk Frothing Thermometer for Pitchers? Which is better for a newbie?
12oz is ideal for single espressos and tight control. If you make doubles or share morning duty, go up a size. VIA CREMA vs the stainless probe — VIA CREMA is user-friendly and often reads quickly; stainless probes can be sturdier and more precise. For a newbie, VIA CREMA is an easy start.
I have the 12oz and it’s perfect for me (solo barista life). If you host, get a larger jug.
Thanks — that helps. Probably start with VIA CREMA and upgrade later.
Huge fan of the “Steam for Texture” section — finally explains pitcher position in a way that makes sense.
I switched to the De’Longhi Stainless Milk Frothing Jug 12oz and the difference was immediate. Smaller jugs give me more control for single shots. Also the Stainless Milk Frothing Pitcher with Art Pen looks cute and practical, tho I haven’t tried the pen yet.
PS — had to re-read the ‘Pour Like You Mean It’ bit several times — feels like a tiny art class 🙂
The art pen really helps if you like detailed lines. Not a must-have but very fun for practicing swans lol.
@Marcus Reed thanks — that’s the sell for me. Going to try the Art Pen this weekend. Fingers crossed my swan stops looking like a potato 😂
If it helps: practice on chocolate syrup or a separate jug before committing to your cup. Low-stakes training!
Glad it helped! Small jugs are great for single drinks — less milk to move around means better control.