Simple Stencil Tricks for Your Best Cup
Make Your Cup Speak
You want a great cup. You want it fast. Stencils give you that. They cut time. They add shape, contrast, and charm. No art school. No long drills.
This piece shows you how to pick stencils. It shows how to prep your tools. It shows simple tricks you can do now. Clear steps. No fluff. You will learn fast. You will lift your latte art.
Read on. Try one trick. See the change. Your cup will speak. Simple moves. Sharp lines. Little flourishes that make a big difference.
These pages are for real people. For busy hands. For mornings and gifts. You will get templates, tips, and quick fixes. Start with the basics. Build bold taste.


Master Mug Painting with DIY Stencils: Quick, Pretty Designs
Why Stencils Work for Latte Art
What stencils deliver
Stencils cut the hard edge from latte art. They give clean lines when your free pour is soft. They make a look repeatable. You can stamp hearts, leaves, logos, and simple scenes. They work with powders, syrups, and microfoam. They hide small faults in pour and crema. They highlight the crema like a frame highlights a photo.
When to reach for a stencil
Use a stencil when you need speed. Use one when you want the same cup every time. Use one for tall drinks where free pour fails. Use it for seasonal or branded designs. In a rush hour, a stencil beats a shaky hand.
A friend who runs a small cafe stamps their logo on 100 cups a weekend. The baristas learned the motion in one 15‑minute session. The line moved. The cups looked the same.
What stencils can’t do
Stencils will not replace good milk or good espresso. They do not teach you to pour a rosetta or a tulip. They won’t capture the fluid, layered sweep of a hand pour. They can mask but not fix bad crema. Use them as a tool. Not as a crutch.
Quick, practical tips
You’ll learn what to use and when. Next, you’ll pick the right stencil for your style and time.
Choose the Right Stencil and Template
Pick the material first
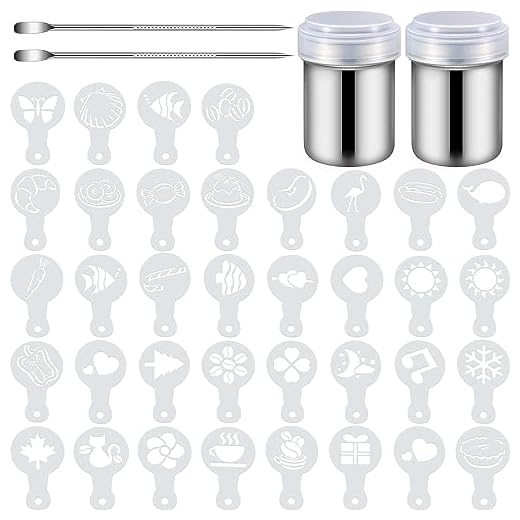
You buy the tool before you pour. Start with material. Metal lasts. Look for food‑grade 304 stainless. It wipes clean and resists bend. Thin plastic or acetate cuts sharp edges. It is cheap and light. Paper is fine for one run. Toss it after. If you want crisp edges every time, spend on metal. If you want to try lots of shapes fast, use plastic.
Match size to the cup
Think rim, not volume. Small cups need tight designs. Wide rims take big crowns and banners. A tiny heart on a 3‑inch cup reads bold. A tiny heart on a 5‑inch mug looks lost. Check pattern scale and line weight. Simple, bold shapes show best on crema. Fine filigree can blur.
Fit and how it sits
Some stencils clip or tuck on the rim. Others sit above the foam on little feet. Rim‑clamp stencils give steadiness. Raised stencils avoid wetting the powder. Try both styles once. See which fits your cups and your pour flow.
Tools that work with templates
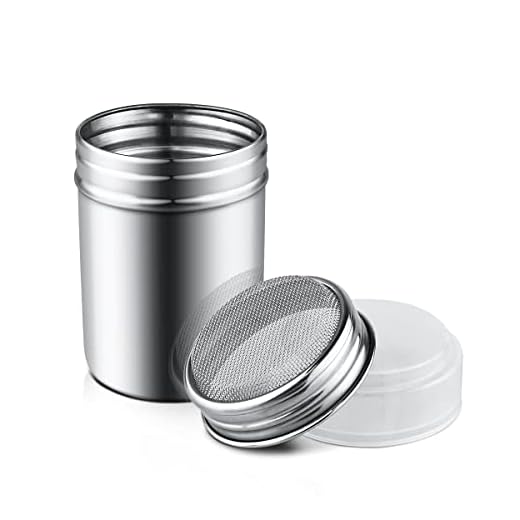
You need a shaker for powders. Get one with a fine mesh lid. For syrup work, get a small squeeze bottle with a 1–2 mm tip. A thin offset bottle helps trace edges. Clean tools keep lines sharp.
What to buy first — and what to skip
Quick real‑world tip
At a weekend pop‑up, a friend took one stainless logo stencil and two plastic hearts. The metal one lasted all day. The hearts let them switch themes in minutes. You will learn the same balance fast.
Tools and Prep: Clean Lines Start with Good Base
Essential tools you need
Start simple. Get the right gear and your stencil work gets honest and sharp.
Milk cues and steaming
You want satin milk. Not too stiff. Not too thin.
A barista I know watches the pitcher. He says, “If it looks like paint, you won’t fail.” It works.
Cup and stencil prep
Calm base. Clean rim.
Quick checks before you dust
Do a fast checklist before you bring the stencil down.
Hold the stencil just above the foam. A slight gap keeps the powder dry and the marks crisp. Don’t rest the stencil on the foam. It sogs the design.
Fast service, simple moves
Work fast. Keep the moves small.
These prep checks make every pass crisp. Next you will learn easy step‑by‑step stencil techniques you can try right away.
Simple Stencil Techniques You Can Do Right Now
Powder stenciling — step by step
Start simple. Hold the stencil steady, just above the foam. Aim for 1/4–1/2 inch (0.5–1.5 cm). Tap the shaker in short bursts. Move your wrist, not your arm. Shake twice. Lift straight up. No sliding. If the powder drifts, you moved too soon.
Syrup tracing
Use a fine squeeze bottle (60 ml works well). Warm the syrup a bit for flow. Squeeze with light, steady pressure. Trace the pattern slowly. Stop. If you want contrast, dust powder over the syrup lines after they sit for 2–3 seconds.
Two‑tone and layered looks
Lay a larger stencil first. Dust a light layer of cocoa or cinnamon. Swap to a finer stencil. Dust a darker layer, like Dutch cocoa. The contrast pops. Keep the first layer light. Too much powder hides the second.

Negative space and shields
Mask parts of the cup to make shapes by dusting around them. Use a small spoon to shield rim edges while you work. Hold the spoon edge on the foam. Bring the stencil down beside it. This keeps the cup edge clean.
Logos and precise pieces
Tape the stencil to a short wooden stick or skewer. Rest the stick across the cup. Place the stencil—then dust. It holds the design steady and keeps your hands out of the way.
Quick fixes when lines blur
Blurred lines mean moisture or too close contact. Lift the stencil. Let the foam dry 5–10 seconds. Blot gently with the back of a spoon if you get a drip. If powder pools, tap the stencil clean and re‑dust very lightly.
Pressure, distance, and motion tips
Keep motions small. Use the wrist for shakes. Hold the stencil steady, then move the shaker. For syrup, squeeze soft and constant. For powder, keep the gap steady. Practice the motion on a saucer first. Repeat until it feels smooth.
A friend at a café taught me this: aim for three steady actions — set, dust, lift. Do those well. You will build muscle memory fast and be ready to make your own templates next.
Make Your Own Templates and Push Creative Designs
Quick DIY steps
You can cut a stencil in minutes. Print the shape to scale on paper. Tape the print to acetate or thin Mylar. Use an X‑Acto #11 blade on a self‑healing mat. Cut with steady pressure. Sand rough edges with fine grit or a nail file. Rinse the sheet. Dry flat. Test the cut on a plain shot.
Tools and where to go
If you want fine work, use a vinyl cutter like the Cricut Explore Air 2, Cricut Maker, or Silhouette Cameo 4. For crisp, repeatable cuts, visit a maker space and run a laser like Glowforge or Epilog. They cut faster and trim tiny bridges.

Design rules that work
Keep shapes bold. Thick blocks read from across the bar. Avoid hairline strokes. Add small bridges so the stencil holds together. Scale patterns to cup size: aim for 2–3″ (5–7 cm) for a 12 oz cup. Use negative space. Simple icons beat fussy drawings when the cup is small.
Play with layers and color
Make seasonal sets. Cut a large base shape and smaller top layers. Offset the top layer by 2–4 mm for a sense of motion. Dust one layer with cocoa and the second with matcha or colored cocoa. Use edible luster dust or freeze‑dried fruit powder for punch. For logos, mount the stencil on a stick to steady it.
Safety and cleaning
Pick food‑safe plastic. PET and Mylar are safe and hold up to cleaning. Hand wash with mild soap. Do not run thin stencils in a dishwasher—heat warps them. Dry flat to avoid bends. Store flat in plastic sleeves or in a labeled folder. Label sets for quick service.
Try each new stencil on a plain shot first. That keeps mistakes off customers. With these steps you will build a library of looks that match your cups and your mood.
Practice, Keep It Simple, Make It Yours
Start small. Use simple shapes. Repeat the same move until it is steady. Clean your tools after each cup. Try one new technique each week. Make one design your own. Pour with calm. Hold the stencil close. Use fresh grounds and dry surfaces. Taste matters more than looks. Share a cup that looks good and tastes true.
Stencils are a tool. Use them well. Learn by doing. Keep the work simple. Keep the cup honest. Show a friend. Ask for a note. Keep one step and master it. Come back tomorrow. Enjoy the craft. Post a photo. Trade tips. Save the moves that work. Keep a small notebook of ideas. Share one cup that makes you proud. Brew better tomorrow.
 Previous Post
 Next Post
Quick care Q: the Stainless Steel Powder Sugar Shaker — can it go in the dishwasher? Someone told me handwash only. Also what’s best to clean those reusable stencil sets without bending them?
If you get stubborn residue, soak briefly in warm water with a splash of vinegar, then rinse well.
I air-dry my stencils on a towel overnight. If you scrub too hard they can lose their crisp edges.
Most stainless steel shakers are dishwasher-safe, but check the product specifics. To be safe, handwash the lid and seals. For reusable stencils, warm soapy water and a soft cloth is best; lay flat to dry to avoid warping.
Stencils are cute and all, but I still can’t get over people paying extra for shaped coffee dust. Call me old-school ☕️
This article made me try stencil art for my little pop-up cafe. Major takeaways:
– Keep designs simple for morning rush
– Clean lines = clean base (latte foam density matters)
– The Stainless Steel Powder Sugar Shaker is sturdier than the plastic ones
Also: if you want to be extra, the 72-Piece Coffee Decoration Set gives you more shapes than you think you’ll need. But beware: it’s addicting.
Random thought: have you used colored powders? I tried beet powder once; looked wild but tasty on a chai.
Totally. Also invest in a couple of extra lids for shakers so you can load them in advance with different powders (cocoa, cinnamon, matcha). Saves time.
Addicting is the right word. I started with the 72-piece and now have three different shakers… send help 😂
For pop-ups, quick tip: pre-cut a few templates you use most and keep them laminated — faster during service and they survive cleaning better.
So glad the guide helped for your pop-up! Love the note about foam density — that’s often the deciding factor. Thanks for the shaker feedback too; it’s helpful for readers choosing between plastic vs metal.
Good operational tips — pre-laminating and extra lids are smart. Glad it’s working out for you, Olivia!
Short and sweet: article made me try matcha stenciling. It worked! Thanks for simple steps.
Awesome, Ethan — matcha stenciling is a great twist. Glad the steps were useful!
I’m debating between the 15-Piece Valentine’s Latte Art Stencil Kit and the 30-Piece Holiday Cookie and Coffee Stencil Set. I mainly do seasonal promos — which one gives more bang for the buck? Also, are the Valentine’s designs too cutesy for adult customers?
I mixed the Valentine’s kit hearts with letters from the 42-piece alphabet set and it looked pro. People loved the personalization.
I use the Valentine’s kit in Feb and switch to the holiday set for Dec. If budget allows, get both — they complement each other.
If you want season-specific promos, the 30-piece holiday set has more variety across holidays, so it’s multipurpose. The Valentine’s kit is cute but can feel niche. For an adult crowd, pair simple hearts with initials or small text from the alphabet set to keep it classy.
Personalization is a crowd-pleaser. Also consider stocking 2-3 staple stencils that match your brand for consistency across promos.
Nice read. For the ‘Make Your Own Templates’ bit: has anyone tried cutting their own letters from the 42-Piece Reusable Alphabet and Number Stencil Set to layer designs? I’m thinking initials over a heart for anniversaries.
Layering is a fun idea. Use lightweight tape to temporarily fix stencils in place if you’re worried about shifting while you dust the first layer. Congrats on the anniversary idea — very sweet!
I did that last month! I used the alphabet set and layered a small heart from the 15-Piece Valentine’s kit. Just watch alignment — make a light pencil mark on the cup first (on the outside) so you can line up the stencil correctly.
I teach a beginner latte-art micro-class and I use a few pointers from this article. A couple extras I tell students:
– Practice on cold milk foam with cocoa on top first — less waste
– Map out where you want the design with a toothpick before placing stencil
– Keep the stencil tools flat and store them between sheets of parchment to avoid scratches
These tiny habits make a huge difference over time.
Fantastic teaching tips, Fiona — practicing on cold foam is such a low-stakes way to learn. Thanks for sharing your method!
45 mins can work if you focus on 2-3 stencil designs and a quick demo. Leave a short hands-on time for students to practice — they learn fastest by doing.
Mapping with a toothpick is genius. Never thought of that, will try it tomorrow.
Storing between parchment is a neat storage hack. My stencils got dinged in a drawer before I started doing that.
Teaching question: how long is your intro class? Thinking of running a 45-min session and want to include stenciling basics.
Okay real talk — the ‘Tools and Prep’ section saved me. I used to just slap a stencil on and go ham with cocoa and it looked like a toddler did it.
Now I:
1) wipe the cup rim and let the foam settle
2) place stencil flat and hold one edge down
3) lightly dust and lift straight up
Big improvement. Also tried the 30-Piece Holiday Cookie and Coffee Stencil Set and the results were festive! Will take more practice but this article’s steps helped a lot.
Good point, Lucas — briefly rubbing the stencil with a clean, dry cloth or an anti-static dryer sheet (lightly!) can reduce static cling. Also trying cocoa instead of powdered sugar sometimes helps with less flying dust.
Yesss that lift-straight-up move is key. Also, if foam is super airy, press the stencil a hair more into it — just not so hard you destroy the pattern.
I still struggle with static making the powder stick to the stencil edges. Anyone got anti-static hacks?
If you’re using those holiday cookie stencils for coffee, remember the smaller designs look better on espresso-size cups. Bigger mugs = bigger stencils.
Love that step list, Sara — that’s exactly the simple order most people miss. Holding one edge down is a great trick to avoid shifting. Thanks for sharing your experience with the holiday set!
Tried a heart stencil this morning. My cat judged me. The heart still looked cute tho. 😹
Loved the ‘Make Your Cup Speak’ idea — been trying to fancy-up my weekend lattes. I picked up the 44-Piece Coffee Stencils on Amazon after reading this and it’s surprisingly fun. Quick Q: does anyone else find the powder shakers clump if you don’t sift first? 🤔
Totally — I always give mine a once-over with a tiny tea strainer. Also, if you’re using powdered sugar it likes to cake up faster than cocoa.
Great to hear you tried the 44-piece set, Emma! Yes — clumping is super common. A quick tip: pop the powder (cocoa or cinnamon) through a fine sieve into the shaker or tap the shaker lid gently before dusting. Also store powders in a dry place.
Try adding a few uncooked rice grains to the shaker? Sounds weird but helps for salt shakers; might work for thin powders too. (no promises 😅)
Fun article. One tiny nitpick: the stencil photos made everything look too perfect. In real life, I still get half-moon smudges sometimes. Is that just me?
Not just you — those photos are often the best attempts. Half-moon smudges usually mean the stencil lifted too slowly or foam was too unstable. Lift straight up and make sure the foam surface is smooth before placing the stencil.
I like the idea but wish there was more on scale — some stencils seem tiny on my latte cup and huge on an espresso. Anyone have tips on choosing size? Also, the 15-Piece Valentine’s kit looks adorable but are the shapes too basic?
I matched stencil size by holding them up to the cup before buying. Sounds obvious but it helped me avoid tiny hearts on my big mugs.
Also remember cup curvature changes perceived size. Flat surfaces (latte bowls) = truer to stencil dimensions.
Great question. For cups 8 oz and under, small-to-medium stencils work best; for 12 oz+ mugs look for larger templates or combine multiple stencils. The Valentine’s kit is basic by design (easy, cute), but you can get creative by layering letters from the alphabet set for personalization.
If you have a printer, print the stencil at different scales and test on paper first — cheap and easy scale check.
Confession: tried to DIY a stencil with cardboard and regret it. The cardboard soaked and stuck to my foam, creating a modern art disaster. 😂
Lesson learned: use the right material (plastic or metal) or buy one of the sets listed.
Been there! I sealed a paper stencil with clear tape once and it was slightly better but still a pain. Invest in a cheap reusable set and thank yourself later.
Hah, classic rookie move. Cardboard can work briefly if sealed, but it quickly fails with steam and moisture. Reusable plastic or metal is way more forgiving.