Best Time to Transplant Your Coffee Seedlings on the Coast
Why timing matters on the coast
Do you want strong coffee plants? Timing is everything.
You grow coffee where days are mild and nights are cool.
Wind, fog, sun and salt shape your plants.
Move seedlings at the right moment to cut shock and help roots.
This short guide points to signs and seasons.
It shows when to dig and when to wait.
It teaches how to harden off plants and shield them from wind and salt.
Keep it simple. Keep it smart.
Follow these steps and give your seedlings the best start. You will see growth and survive storms.


How to Transplant Coffee Seedlings Like a Pro
Read the coastal climate and your microclimate
Watch air and soil temps
You must measure both air and soil. Plant roots feel soil temperature more than air. Stick a probe 10–15 cm deep. Check at dawn and midafternoon. Record highs and lows. Look for nights that stop dipping below your safe threshold.
Tools you can use
You do not need fancy gear. A cheap digital air thermometer with max/min will do. A soil probe with a 6–8 inch stem gives quick reads. A data logger is handy if you want long records. Compare cost: an analog soil probe ($10) is fast and rugged. A digital probe ($30–$60) reads more precisely. A basic Hygrometer/Thermometer like the ThermoPro units works for air.
Map wind, fog and salt
Stand in your field. Face the ocean. Note the wind path. Walk inland until you stop tasting salt on your lips. Mark that line. Note fog days and how long the sun stays blocked. Find ridges that warm early. Find hollows that trap cold. Sketch a simple map. These marks tell you where to plant and where to protect.
Keep a simple log
Write this down each day:
Pick a rule spot
Choose one planting spot and treat it as the rule. If you have other spots, repeat the checks. Watch for late cold snaps. When nights stay mild and soil warms, you will know the window to move seedlings.
Choose the right season and watch the cues
Aim for a gentle start
On the coast you plant for calm, not speed. Pick late winter into spring when days warm and nights ease. Do not trust a date on the wall. Trust what you see.
Watch soil and night temps
Soil rules root life. Wait until the root zone holds about 55°F (13°C). Check at 4–6 inches deep for several days. A single warm afternoon does not count.
If nights still dip below your cold threshold, wait. If nights stay steady and soil stays warm, you have one big cue in your hand.
Use living signals
Look at plants around you. When nearby trees push fresh shoots, your slope is waking. When weeds green up and grasses grow, the soil is ready. Watch your seedlings too. Strong new shoots. Firm leaves. No yellow tips. That tells you the plant will settle.
A neighbor planted too soon one year. Warm days fooled him. A late cold night scorched the young leaves and slowed growth for months. He learned to wait for steady signs.
Avoid traps: wind, water, pests
Do not plant before a long gusty run. Wind dries young plants and salt can burn them. Plant after rains, but only when the site drains. Test by walking the spot. If your boot squishes, hold off. Also watch pest and disease pressure. If slugs and aphids spike after wet spells, treat or delay until you can protect seedlings.
Week-before checklist
If most boxes are checked, move. If not, wait a few days and watch again.
Prepare your site and soil for coastal challenges
Fix drainage and soil structure
Coffee hates wet feet. On clay, raise beds or plant on mounds. Dig a planting hole 30–45 cm deep and fill the base with coarse gravel if water pools. On sandy spots, add lots of compost, coir, or composted bark to hold moisture and nutrients.
Manage salts and rinse pockets
Coast salt kills young roots slowly. Keep salts low. If you find white crusts or scorched leaf edges, flush the soil in the wet season with fresh water to leach salts down. Mark and avoid salty patches when you plant. If you must use them, plan extra rinses.
Shield from wind and salt spray
Place seedlings where a building, hedge, or tree row breaks the wind. If nothing exists, erect temporary wind fences or use shade cloth for the first 6–12 months. A wind break cuts salt spray and reduces moisture loss.
Mulch, spacing, and airflow
Mulch keeps roots cool and moist. Use coarse mulch: bark chips, wood chips, or coarse coconut coir. Keep mulch 5–10 cm deep and away from the stem base.
Water control and frost points
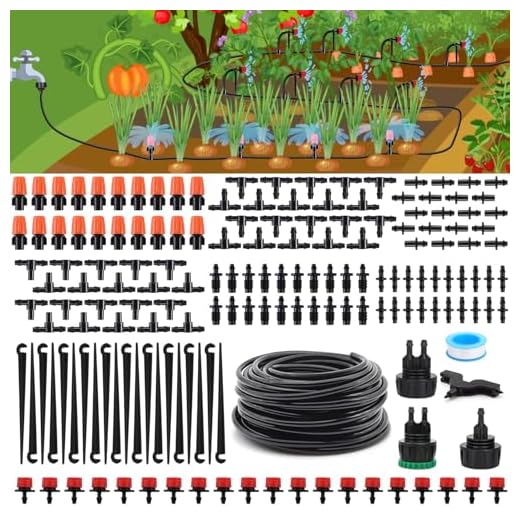
Prepare irrigation so roots never dry in the first months. Drip lines and soaker hoses target the root zone and save water. Fit a filter, pressure regulator, and a timer. Install before you plant.
Mark frost pockets on your map. Avoid them where you can. If you must plant there, plan covers or heaters for cold nights.
Do this work before you set a single seedling in the ground. It cuts surprises and halves the toil after planting.
Know when seedlings are ready and how to harden them off
What a ready seedling looks like
A ready seedling shows steady growth. The stem is firm. The root ball holds the soil but is not tangled. Aim for three to five true leaves at least. Check leaf color and texture. Pale, yellow, or spotted leaves need fixing before you move the plant. Do not rush a weak seedling into the ground.
Quick readiness checklist
How to harden off in steps
Move seedlings to a shade or airy spot two to three weeks before transplant. Do it in stages. Day one: an hour of outside air and wind. Add an hour each day. Reduce water slowly. Dry the surface a little between drinks. Expose them to more sun in small steps. Watch for stress. If leaves wilt or burn, pull back a step.

Final handling and trimming
Trim weak roots and broken shoots before planting. Cut clean. Keep the root ball intact. In the last days, keep seedlings moist but not soggy. Avoid waterlogging. Use small pots for a deeper, denser root mass. Large pots slow root change and can cause a lag after transplant.
Work flow and coastal tweaks
Label seedlings and work by batch. Plant the strongest first to steady your hands. In hot, sunny coastal spots give extra shade for a week after transplant. In cool, foggy zones focus on warming the soil and keeping the root zone active with thin mulch and morning sun.
Next you will learn how to plant on the day itself and how to cut shock so growth starts fast.
Planting day and early care to cut shock and set growth
Pick a calm day and the right hole
Plant on a calm morning. Wind dries and shocks. Dig a hole that fits the root ball. Wide enough. Deep enough to set the crown at soil level. Too deep and the stem will rot. Too shallow and roots dry.
Backfill and firm gently
Place the seedling. Backfill gently. Press soil to remove large air pockets. Do not stomp hard. Water deeply at planting. This settles soil and links roots to ground.
Watering setup and first rhythm
Install drip or hand-watering lines. Simple kits work. Try a 1/4″ dripline or a soaker hose like Gilmour. A timer helps. Water small and steady for the first weeks to push roots outward. Do not drown the plant. Check moisture daily for two weeks. If the top inch is dry, water.
Shield from salt, sun, and wind
Watch for salt burn after onshore winds. Rinse leaves with fresh water if salt builds. Protect young plants from strong afternoon sun for about a month. Use shade that gives gentle dappled light. Stake if wind will sway the stem. Prune only damaged branches at first.
I once planted a row of 30 seedlings behind a bluff. I used shade cloth and a simple drip. Half did better. The wind made the rest stall.
Feed, fight pests, and keep notes
Fertilize lightly only after you see new growth. Heavy feed too soon will burn roots. Scout for pests and disease every week. Remove infected leaves fast. Keep a log of planting dates, water, and losses. That data will refine your timing next season.
Over the season, ease feeding and trim extra water as roots grow. The first year is about roots. Help them expand.
Next, move to simple rules you can use all season.
Simple rules for coastal success
You want steady starts and quick roots. Watch your microclimate. Wait until soil is warm. Pick nights that stay mild. Harden seedlings before you move them. Prepare soil and wind breaks. Set irrigation and drip if you can. Plant on calm days. Water deep at planting.
Protect from salt and gusts. Mulch to keep moisture. Be patient. Build roots first. Do not rush leaves. Use the coast’s light and mild air. With care your seedlings will set and grow strong. Go plant with confidence. Return, observe, adjust, repeat each season for better and larger harvests.
 Previous Post
 Next Post
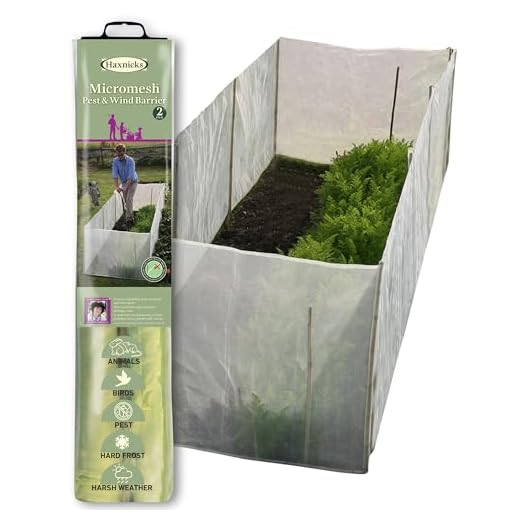
Great article — finally someone spelled out coastal timing instead of vague ‘spring is fine’. I used a stainless steel soil thermometer last year and it changed everything: planted when the soil hit about 65°F and the seedlings sailed through. Also big +1 for the Micromesh Pest and Wind Barrier — saved my seedlings from salt-laden gusts.
Quick Q: anyone pairing the drip irrigation kit with a row cover? Wondering about condensation under the cover.
I do the drip kit + row cover combo. Turn on irrigation in short bursts in the morning so leaves dry quickly. Works well for me.
If condensation’s bad, a small fan (solar if you’re off-grid) really helps air circulation under covers. Also check for soil temps — if the soil’s warm, less dew forms.
Thanks Laura — glad the thermometer tip helped! For condensation, try opening the floating row cover a bit during warm afternoons or use drip lines with emitters placed away from leaf contact. That usually keeps humidity from spiking under the cover.
I found the drip irrigation kit to be a total game-changer for coastal plots. Watering by hand? In wind? Nah. The kit keeps things consistent and less stressful for seedlings.
Also this line made me laugh: ‘Simple rules for coastal success’ — as if coastal gardening ever wants to be simple 😂 But the tips here do make it feel doable.
Totally — drip systems reduce evaporation and keep root zones steady, which is huge with salty winds. Glad it resonated!
Did you DIY your drip layout or go with a kit layout? I’m debating how many emitters per seedling to use.
I used the kit and split lines; 1 emitter per seedling was fine for my loamy coastal soil. Sandy soil might need two or higher-flow emitters.
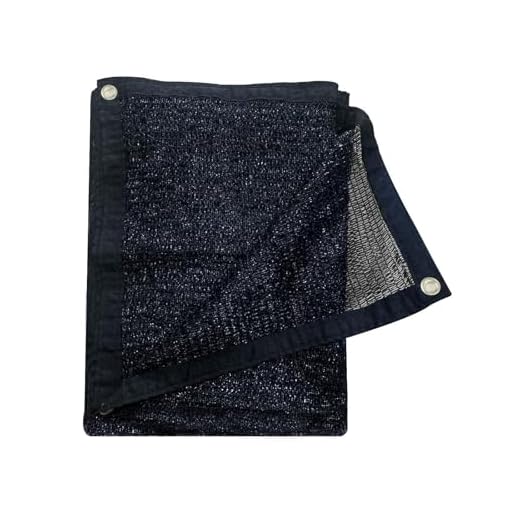
Nice piece. Quick product Q: for those who’ve used the 55% Shade Cloth Tarp with Grommets, how durable are the grommets in constant salty air? And does the Micromesh Pest and Wind Barrier come in sizes big enough for a 10×10 setup?
Would appreciate real-world durability notes before I buy. Also — shoutout to the 10x30ft Floating Row Cover for frost protection — that thing saved my seedlings last spring.
Thanks for the tips everyone — practical maintenance and sizing tricks are exactly the kind of community insights I’ll weave into the article.
For the micromesh: I sewed two 4×5 panels together and used zip ties to secure. Held up through a storm last year.
Good questions, Evelyn. The shade cloth’s grommets hold up well if you rinse salt off every few weeks; stainless or brass grommets resist corrosion best. Micromesh barrier sizes vary — many manufacturers have panels you can seam together for 10×10; anchoring is key. I’ll add durability notes to the product mentions.
I live right by the bay — my tarp grommets lasted two seasons with a rinse-and-dry routine. If you skip maintenance, they’ll corrode faster though.
Nicely written piece. I liked ‘watch the cues’ — watching leaf color and root development saved me from transplanting too early last season.
Curious: anyone used the 36-Cell Reusable Seed Starting Tray by Burpee for coffee seedlings? Are cells big enough for a proper root ball before transplanting, or should I pot up once more?
Thanks Priya. The 36-cell tray works for early stages, but coffee roots can get bound if left too long. Potting up once into slightly larger cells (or 72-cell to 36-cell transfer) before final transplant is safer unless your seedlings are root-pruned regularly.
I moved mine from 36-cell into 4-inch pots once they hit the 3rd true leaf. Gave them room to develop fibrous roots without shock.
Super helpful!! 🙌 I bought the Stainless Steel Soil Thermometer, 0-220°F Range after reading the article and it’s been life-changing. One tiny typo in the ‘hardening off’ paragraph but otherwise perfect. Also LOL at ‘cut shock’ phrase 😂
Thanks Samantha — appreciate the heads-up on the typo. Glad the thermometer is working out for you! ‘Cut shock’ is our dramatic way of saying reduce transplant shock 😄
Which thermometer did you get? I can’t tell stainless models apart sometimes. Any brand recs?
Longer comment — sorry, I like detail lol:
I love the section on ‘Read the coastal climate and your microclimate.’ On my bluff the wind is nuts until late May, so I swear by the 55% Shade Cloth Tarp with Grommets, 6.5x10ft + micromesh barrier. Big lesson: shade isn’t just for sun, it breaks wind and reduces transpiration.
Also — hardening off: I start with 2 hours outside in sheltered spot, increase daily. If you skip this, expect tears 😅
Would’ve liked a quick checklist for planting day (tools + temps + watering schedule) in the article, but overall solid.
Agreed on wind being the real villain on coasts. Shade cloth + grommets make ties easy. Also, don’t forget to anchor tarps — grommets are only useful if you secure them well.
Good tip Ben — I recommend sandbags or ground stakes depending on soil. I’ll mention anchoring methods in the update.
That checklist would be so helpful! Your hardening routine matches mine. I also tape a tiny tag with the seedling’s last indoor feed date — helps track stress!
Great detail Marcus, thank you. A planting-day checklist is a good idea — I’ll add a compact one: check soil temp (thermometer), wind/shelter, pre-water seedlings, set drip emitters, install micromesh or shade cloth, and plan staggered shade removal over 3–5 days.
Good article but felt a bit light on dealing with salinity and salt spray — especially for people literally on the coast. Floating row covers are great for frost but not for wind-driven salt. The Micromesh Pest and Wind Barrier was mentioned and that’s the right direction, but more advice on washing leaves, using barrier height, or soil amendments would help.
Still useful overall — just want more specifics!
Also mulch helps — keeps salt crust from getting to the root zone as much. Not perfect but reduces splash from rains.
Excellent point, Owen. I can expand the ‘Prepare your site’ section to cover salt mitigation: physical barriers height/placement, regular foliar rinses (early morning), windward planting of sacrificial rows, and gypsum/organic matter for soil structure where salt is an issue.
For anyone trying this: test a small patch first. Salt damage patterns are weird and microclimates vary. Better to experiment on a few seedlings than the whole batch.
Thanks all — I’ll add mulch and cover-crop suggestions to the article too.
Yep, salt is sneaky. I plant rows of clover windbreaks and use the micromesh at 3–4 ft high. Rinse seedlings every two weeks if salt spray is heavy.