Dry Your Coffee Cherries Indoors, Step by Step
Why Dry Your Coffee Cherries Indoors in Rainy Climates
You can still make clean, sweet coffee when the rains fall. Drying inside keeps fruit safe from mold and rain. This guide shows simple ways to dry by hand and with gear. You will learn to plan, sort, set up racks and control air.
Follow clear steps for spread, turn, monitor and adjust. Learn to use dehumidifiers, fans and mild heat. Finish with rest, hull and store to lock in flavor. You will keep more crop and raise quality with steady daily work.


Growing and Drying Coffee Beans at Café Guapo
Plan Your Indoor Drying: Space, Volume, and Goals
Decide your scale and goal
Decide what you want. Quality or steady volume. Small batches give control. Large batches give steady supply. Pick one. Your goal will drive the rest. Write it down in one line.
Measure space and headroom
Pick a room that stays dry and cool. Measure floor area and ceiling height. Note doors and windows. You need room for racks and for you to move. Leave 30–50 cm of air above trays for airflow. Check power outlets and extension needs. Safety first.
Count kilos and test a tray
Do a small test. Fill the tray you plan to use to your usual spread depth (1.5–3 cm). Weigh it. That tells you kilos per tray. Multiply by trays you can fit. This is faster and truer than guessing. If you plan 100 kg, practice with 10 kg first. You learn the pace.
Make a gear list
Write a clear list before you buy. Keep it spare and practical.
Set targets and a simple timeline
Set a moisture target (aim for about 11–12% moisture for finished dried coffee). Plan checkpoints: day 1, day 3, then daily. Expect 7–21 days depending on your control. Faster means more gear and power. Slower means more risk of mold.
Keep the plan simple. It will guide the rack layout and gear you pick next.
Select and Prepare Cherries: Sort, Clean, and Choose a Process
Sort the fruit
Start with good fruit. Work in a clean room or on a clean table. Remove green, split, insect‑bitten, and moldy cherries. These ruin a whole tray.
On a small harvest, you can do this by hand. On larger lots, use a simple hopper and sorter from a local coffee supplier.
Float and clean
Fill a clean tub with potable water. Gently stir the cherries. Floaters are off. Pull them out. Sinkers are usually sound. Rinse the sinkers once or twice. Drain well. Dirty water breeds bacteria. Change it often.
A quick rule: if more than 5% float, recheck your picking and sorting.
Choose natural or washed
Decide early. It changes steps and tools.
Ferment gently (if washed)
After pulping, place beans in clean tubs. Cover loosely. Let them ferment 12–36 hours. Stir or check every 6–12 hours. Stop when the mucilage peels with a gentle rub. Over‑ferment and the cup goes sour.
Drain and wash. Use a fine mesh to stake off excess water. Let them drain for 30–60 minutes before spreading to dry.
Be strict now. Bad fruit brings mold and sour notes. Sort again if needed. With clean, steady cherries at hand, you’re ready to set up racks and airflow.
Set Up Your Drying Space: Racks, Trays, and Airflow
Raise and pick racks
Keep cherries off the floor. Use sturdy racks with mesh or perforated trays. Metal frames last. Wood warps. Pick a rack that holds weight without sagging. Test one with a tray of water. If it bends, replace it.
Trays and underlayment
Use food‑grade perforated trays or cooling racks (18 x 13 in work well). They let air pass under each cherry. Lay cheap tarps or painter’s sheets under racks. They catch drips and make cleanup fast. Fold sheets back at day end and sweep.
Airflow and layout
Space trays so air moves on both sides. Leave 10–15 cm (4–6 in) between layers for small batches. For large loads, give 20–30 cm (8–12 in). Point a fan down the room, not at one tray. A Vornado 630 gives steady flow. A Lasko 20″ box fan moves more air for big rooms. Set fan low and steady; never blast.
Light, pests, and sealing
Keep light low. Sunlight heats spots and speeds uneven drying. Close curtains or use a shade. Seal windows and vents against rain and ants. Use weatherstrip or screen mesh on gaps. Put sticky traps where you see flies.
Make paths and work flow
Create clear aisles. You will move trays often. Measure before you place racks. A 60 cm (2 ft) aisle lets one person pass with a tray. Mark spots on the floor with tape. Stack empty trays nearby for fast swaps.
Set your room once. Then run one trial tray. Watch for cold pockets and adjust spacing. The next section covers moisture control and timing.
Control Moisture and Temperature: Dehumidifiers, Fans, and Heaters
Read the room first
You must know the numbers. Put a hygrometer and a thermometer in the room. Place them at tray height and away from direct air or heat. If the room sits above 75% RH, you will not dry well. Aim to cut that by half. Slow, steady loss wins.
Dehumidifiers: pick and place
Use a dehumidifier when the air is wet. Small rooms do fine with a 30–50 pint unit (hOmeLabs 30‑pint or Frigidaire 50‑pint work well). Put it near the center of the room. Empty the tank or plumb the drain. In my shop a 30‑pint dropped RH from 82% to 48% in a day on a light load.
Fans: move the air, don’t blow everything dry
Fans stop pockets of damp air. Run them low and steady. Point them along aisles, not at single trays. Use mixed flow: one fan for room circulation and one for gentle cross‑flow. A table fan works for small batches.
Heaters: soft warmth only
If you add heat, use a thermostat. Oil‑filled radiators or ceramic heaters work. Keep temperatures steady. Stay in the 20–30°C (68–86°F) band. Do not blast at high heat. High heat cooks the fruit and seals moisture inside.
Simple checklist
Watch devices. Listen for clogged filters. Move a hygrometer to check for cold spots. When the room holds steady, you’ll be ready for the step‑by‑step spread, turn, and monitor routine next.
Drying Process Step-by-Step: Spread, Turn, Monitor, and Adjust
Spread thin and even
Lay cherries in a single, thin layer. Do not pile. Each cherry must touch air. Leave small gaps so air flows. If you crowd trays, drying stalls and mold starts. Aim for 1–2 cherries deep on mesh trays.

Turn often at first
Turn or rake the fruit every 1–3 hours in the first day. This evens the dry and stops hot spots. After 48–72 hours, cut back to twice a day. Near the end, turn once daily. In my shop I turned every 2 hours for the first day and saved a batch that otherwise roasted unevenly.
Monitor moisture the smart way
Use a moisture meter if you have one (Delmhorst or Hanna models work). If not, weigh a tray at the start and track loss. Do hand checks:
What to log
Spot problems and adjust
If you see mold, remove those cherries fast. Toss them. If the room is too wet, slow the batch. Run a dehumidifier or dry fewer trays. Lower load density before raising heat. If berries shrivel unevenly, add gentle airflow or move trays between racks.
Keep notes on each run. Numbers teach you faster than guesswork. You will learn from them.
Quality Checks and Post-Drying: Resting, Hulling, and Storage
Test final moisture
Aim for a stable low read. Target 10–12% moisture for beans meant for storage. Read several spots on a tray. Use a meter for repeatable results. If you do a hand test, bite one. It should be leathery to hard. The seed should rattle free. If it feels sticky or soft, dry more. Small errors here cost you a whole harvest.

Rest and cure
Let the cherries equalize. Move trays or mesh bags to a cool, dry room. Leave them 3–10 days. Check for hot spots. Smell them daily. A short cure evens moisture and calms the fruit. I once saved a batch by resting it two extra days. The color evened and the cup improved.
Hulling or milling
Hull a small test lot first. Remove husk or parchment per your process. Inspect beans for cracks, uneven color, and beans stuck to husk. Adjust your huller settings if you see damage. Keep a log of machine speed and settings for each lot.
Store and label
Store in sealed bags, food-grade bins, or buckets with tight lids. Keep them cool, dry, and dark. Avoid temperature swings. Use small batches. That way if one lot shifts, you lose less.
Test again after a week. If moisture creeps up, re-dry or roast sooner. With your lots tested, cured, and packed, you are ready to move to the final wrap-up in the Conclusion section.
Start Small. Dry Well. Save Your Harvest.
Indoor drying in rain is work. It is steady work. Start with a small batch. Learn each step. Keep notes on time, temp, and moisture. Turn fruit often. Watch for mold. Adjust heat and airflow with care. Test beans. Taste the changes.
Grow skill before you scale. Keep a simple log. Repeat what works. Fix what fails. Rest the dried cherries. Hull with care. Store in cool, dry jars. Your coffee will thank you. Share your wins and keep refining. Stay patient. Ask others. Trade samples. Learn from each roast and cup. daily.
 Previous Post
 Next Post
Nice article. I never thought about drying cherries indoors — why not just use a large 6-Tray 600W Food Dehydrator? Seems simpler than racks and turning every few hours.
Question about contamination: if I dry cherries indoors in a shared living room, should I worry about dust/pet hair? Any quick barriers that won’t suffocate the cherries?
Lol thanks, I’ll try the mesh rack first. Sheets + cat = drama.
If you’re very concerned, set up in a spare room and run a dehumidifier to control humidity without heavy heat.
Also wash and sort well — fewer damaged cherries = less chance of off-odors or contamination during drying.
I put a thin cotton sheet over trays and keep a fan on low. Not perfect but kept my cat away lol.
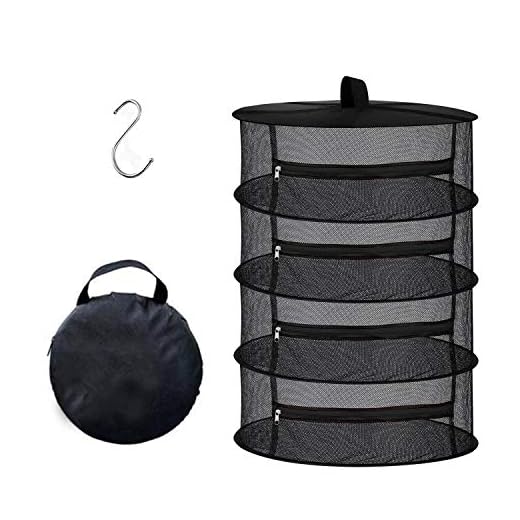
Good question. Use breathable mesh covers or the Collapsible 4-Layer Mesh Herb Drying Rack with the zipper to keep dust/pets out while maintaining airflow.
Great write-up — I loved the step-by-step. Quick question: has anyone actually used the Compact 35oz Quiet Auto-Shutoff Room Dehumidifier for cherries? I’m worried it won’t keep humidity low enough in my basement during monsoon season. Also, tiny typo in the “Set Up Your Drying Space” section 😅
I use that exact dehumidifier for hobby batches. It’s quiet and auto-shuts off when full, but yeah, if you’ve got a damp basement it struggles overnight without extra airflow.
If you want, tell me how big your batches are and I can suggest a setup (rack + fan + dehumidifier) that’ll work within budget.
Thanks Sophie — good catch on the typo, I’ll patch that. For the dehumidifier: it works well for small batches (like a few trays), but if you’re doing a whole bag you’ll want a larger unit or to pair it with a fan to keep airflow consistent.
I feel like the article could have a quick troubleshooting subsection — e.g., what to do if cherries get moldy mid-dry. Otherwise, solid.
This made indoor drying less intimidating. One silly thought: is the Foldable Indoor Laundry Drying Rack googly enough to pass for decor if I leave it up? Asking for a friend 😂
Sold. Functional decor it is. Thanks!
Haha — depends on your aesthetic! If you drape a neutral cloth or keep trays tidy it could double as a functional decor piece.
Anyone tried the Foldable Indoor Laundry Drying Rack, Chrome Finish as a DIY drying rack for cherries? Looks sturdy enough and folds away when not in use.
Yep — it’s a great budget option if you drape mesh over the bars or place trays. The chrome finish can get sticky if your cherries are super juicy, so layer with breathable mesh or trays.
I did exactly that last season. Works fine for 1–2 trays. If you’re drying lots, the mesh rack or a dehydrator is less hassle.
This was super practical. Also — who else almost married their food dehydrator? 🙋
Large 6-Tray 600W Food Dehydrator, Digital Control: sometimes feels like cheating, but honestly it gives consistent results. Downsides: noise and electricity draw. Worth it for regular drying though.
Exactly — monitor and adjust. And when in doubt, slower low-temp drying preserves flavor better than blasting heat.
Good call on rotating. I used to assume identical heat across shelves — silly me.
Pro tip: rotate trays and monitor with the Handheld Coffee Moisture Tester Model 08150. Even digital dehydrators can have hotspots.
Haha, I hear you. The dehydrator is a fantastic tool for consistency, especially if you don’t have good airflow in your drying space. Just keep temps reasonable.
Would you recommend the 12-Inch Quiet High-Airflow Table Fan over multiple smaller fans? Thinking of airflow distribution for 6 trays spread across a room.
If you’re covering a wide area, multiple small fans can create more even cross-ventilation. The 12-inch unit is great for targeting a rack or a narrow zone, but several low-speed fans spread out are ideal for uniform drying.
Good tip Liam — appreciate the practical setup ideas.
Exactly — even low airflow helps equalize surface evaporation without creating crusts.
Also watch where you point them. Directly at cherries can cause uneven drying; pointing between racks to induce laminar flow works better.
I did multiple clip fans on low and it was surprisingly even. Less hotspot risk than one strong fan.
Thanks — I’ll try a few small ones then. Trying to avoid that crispy-on-top, damp-inside issue.
Loved the tip about the Collapsible 4-Layer Mesh Herb Drying Rack for delicate cherries. I used a similar herb rack for peppers and it worked great. One tiny gripe: shipping links in the article are intrusive on mobile.
Thanks — I’ll flag that with the team. Glad the rack tip was useful; it’s a versatile piece of kit for small-scale drying.
Just tried the indoor method this weekend.
What worked: foldable rack + mesh sheets, 12-inch fan on low, checking with the moisture tester.
What didn’t: I overcooked one tray in a dehydrator setting that was too hot. Flavor went flat. Learning curve for sure.
I left most ~12–16 hours across a couple of days, turned often. The overheated tray was at too high a single-session temp and only took 6 hours — flavor loss for sure.
How long did you leave them? I always worry about under-drying and mold.
Thanks for the report, Michael. Sounds like a perfect example of why monitoring temp and moisture is crucial. Lower temp + longer time usually preserves better flavor.
Loved the “Start Small. Dry Well. Save Your Harvest.” mantra. Came here for practical tips and got them. One thing — the 12-Inch Quiet High-Airflow Table Fan, 70ft Reach sounds overkill? 😂
Not overkill if you’ve got a large room or want really consistent airflow. For a closet or small room, a smaller fan pointing across trays is enough.
Short and sweet: moisture tester = game changer. Bought the Model 08150 after reading this and no regrets. Still experimenting with fan placement though.
Nice! For fan placement, try angling it to create gentle cross-flow rather than blasting directly. Keeps cherries from tumbling and evens drying.
Second that. Gentle cross-flow avoids crusting on top while insides stay moist.
This is gold. I started with one tray and totally ruined a harvest last year — thought sun-drying was ‘set it and forget it’ 😂
Plan I learned the hard way:
1) Start small. Seriously.
2) Get a mesh tray or the Collapsible 4-Layer Mesh Herb Drying Rack for cherries you want to preserve whole.
3) Use the Handheld Coffee Moisture Tester Model 08150 to know when they’re truly ready.
Also, long-term storage tips would be great — can I store hulled beans in mason jars right after drying? Or should they rest? Tons of questions but your “Resting, Hulling, and Storage” section was helpful.
Also remember: drying speed affects flavor. Too fast with high heat (like an overpowered dehydrator) can taste flat. Slow and steady tends to keep complexity.
Happy to help — post back with your first batch pictures if you want feedback!
Glad that helped! Yes — rest the cherries (or parchment beans) for a week or two if possible before hulling for more even moisture equilibration. Mason jars work if moisture is low and you use oxygen absorbers for long storage.
I leave hulled beans in breathable bags for a few days after drying, then move to jars. If you jar immediately, check moisture with the 08150 — better safe than moldy!
Totally agree on the mesh racks. They’re cheap, portable, and don’t concentrate heat like some dehydrators. But for consistent small-batch drying, that 6-tray unit is very tempting.
Thanks for the tip about heat and flavor. Ok — rest first, then hull. Buying the moisture tester now 😂