Step-by-Step Guide to Froth Milk Without a Machine: Nail Rich Foam for Your Cup
Make Bar-Quality Foam Without Fancy Gear
You can make RICH foam at home. No machine needed. You will use simple tools, smart heat, and a steady hand. Even baristas will be impressed by your cup today.
What You Need

Master Froth in 5 Minutes—No Machine Needed
Pick the Right Milk and Tools
Small change. Big foam. Which milk wins and which tools save you time?Choose milk that froths. Whole milk gives thick cream. 2% gives good body. Oat and soy often froth well. Avoid very low‑fat milks; they thin the foam.
Try whole milk (3.5%) for rich crema. Try 2% for a latte body. Try plant milks labeled “barista” — for example, Oatly Barista or Silk Soy Barista. Test a small splash first to see how it holds.
Ready your tools. Grab a jar with a tight lid for shaking. Grab a whisk for control. Use a French press like a mini steam wand to build pressure and shear.
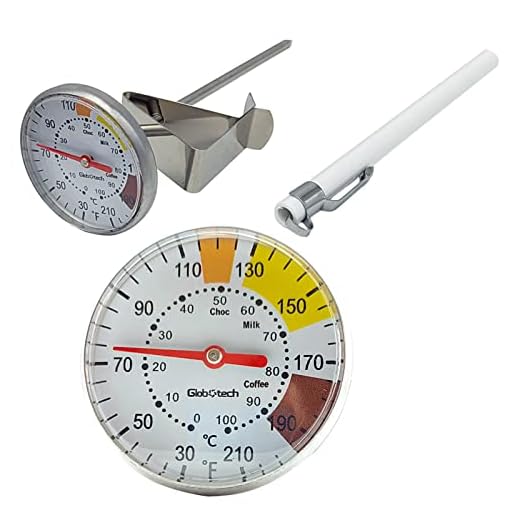
Place a thermometer or trust a warm hand. Aim for milk that will be warm, not hot. Aim for 55–65°C (130–150°F) if you use a thermometer. Aim for warm to the touch at the wrist if you don’t.
Set your cup nearby. Keep everything in reach before you heat or stir.

Heat to the Right Temperature
Heat matters. Too hot kills flavor. Too cold kills foam. What temp wins every time?Warm the milk slowly. Use low to medium heat. Heat in a small pot or the microwave in short bursts.
Aim for 140–150°F (60–65°C). Hit this range and stop. This is warm, not hot.
Check with your wrist if you lack a thermometer. Test by touching the outside of the container. Feel hot but not burning.
Stir as you heat. Move the milk with a spoon or whisk to keep the temp even and the proteins ready.
Avoid boiling. Boil and the proteins break. Boil and the milk will not foam well.
Remove from heat right as it reaches target. Let it sit 10–15 seconds. That short rest helps the milk settle and builds a predictable base for frothing.
Create Initial Froth: Choose Your Method
Jar shake, whisk, or French press — which trick gives the densest, silkest foam fast?Pick a method that fits your gear.
Fill a clean jar one-third with warm milk. Screw the lid tight. Shake hard in short bursts for 30–45 seconds. Stop when the milk’s volume roughly doubles. Think of shaking a jar of paint. Use short, fierce moves.
Whisk in a bowl or pot. Whip fast. Use a back-and-forth wrist motion. Aerate at the surface with quick strokes. Then sink the whisk and fold the foam back in. Picture stirring a storm into calm water.
Pour warm milk into a French press. Pump the plunger up and down fast. Use 10–15 strong pumps. Watch the foam climb the sides. Stop when it looks thick and glossy.
Check the texture. You want glossy peaks and fine bubbles. If bubbles look large, keep working.

Refine the Microfoam and Texture
Fine foam wins. How do you turn froth into silky microfoam fit for latte art?Settle the milk. Tap the container on the counter to pop big bubbles. Watch the surface. Stop when the foam looks even.
Swirl the milk in a circular motion to unify the foam. Let the heavy liquid sink to the bottom. Scoop from the top if you want thicker foam. For example, scoop a spoonful off the top and set it aside. That gives you a denser dollop for cappuccino.
Fold the foam gently into the liquid for silky microfoam. Use a spoon or the whisk in a slow, folding motion. Use short, controlled pours when you pour. Keep your wrist steady. Aim for a glossy sheen on the milk.
Use these quick fixes when needed:
Finish with calm hands. Pour with purpose.

Pour, Serve, and Troubleshoot
Pour like a pro. Small fixes that save your cup when foam falters.Tilt your cup.
Pour milk from a low height to mix first.
Raise the pitcher or jar to finish with the foam.
Bring the stream low for latte art and finish with a quick wrist move.
Try this example: pour low to lay a base, lift slightly, then flick your wrist to draw a heart.
Check heat and milk type next time if foam collapses fast.
Tap and swirl more if bubbles look large.
Avoid overheating if the foam feels grainy.
Clean your tools now. Wipe or wash the pitcher, whisk, or jar.
Scrub residue away. Residue kills later froth.
Practice. You will learn timing. Your cups will improve fast.

You’ve Got This
You can make rich foam with simple tools. Heat right. Froth hard. Refine gently. Pour with calm hands. Try it now. Share your results and join the fun today again.
 Previous Post
 Next Post
Quick troubleshooting I discovered after many failed attempts:
1) If foam is too airy, try reducing whisk speed and focusing on aeration time.
2) If microfoam is too dense, you’re probably under-aerating — give a short burst of air at the start.
3) For latte art: tilt the cup and pour low, then raise the pitcher for contrast.
Thanks for the guide — super practical. Also, props for keeping it appliance-free, my kitchen counter had a freakout about another gadget.
Haha counters are relieved. Also, try practicing pour speed — slow for defined shapes, quick for bigger hearts.
That raise/lower pitcher tip is gold. Thought it was sorcery until I tried it.
Love the concise troubleshooting checklist — very actionable. And yes, less gadgets = happier counters. Appreciate the latte art pouring pointer!
Awesome guide — finally something that doesn’t require a $300 machine. I tried the jar-shake method last night and got decent foam. Two quick notes:
1) Whole milk gives the silkiest texture, not the frothiest heads. 2) Don’t overheat — I hit 75°C once and it tasted ‘cooked’.
Thanks for the troubleshooting tips in step 5, saved my espresso night 😊
I had the same ‘cooked’ taste once — instant regret. Turning the heat off a little early works wonders. 🙂
So glad it helped, Olivia! Yep, whole milk gives richer microfoam, but for big fluffy heads 2% can be a sweet spot. And good catch on temperature — aim for ~55–65°C (130–150°F).
Agree on the temp. I use a thermometer app and stop when my wrist feels warm — old barista trick. Also, try slightly colder milk for better initial foam before heating.
Okay serious confession: I tried the jar-shake method while doing a 30-second workout and nearly threw my coffee at the ceiling. Still, foam was decent. 😂
Longer note:
– For those trying latte art, practice on a flat bowl first. The guide’s pouring tips helped a lot.
– Foam longevity varies a ton between milks — it’s a personality trait, apparently.
I applaud your dedication and spillage. Also, keep a hand towel nearby for the inevitable splatters 😉
Haha, the workout-shake method is a mood. Practicing on a bowl is a great low-risk way to get pouring technique down. Foam definitely has a ‘personality’ — some are clingy, others run away fast.
Try starting with a small pitcher for pours if you’re rehearsing art. Less to spill = fewer ceiling incidents.
If you’re into aesthetics, practice shapes on toast with cocoa powder first — weirdly satisfying.
Love the ‘You’ve Got This’ pep talk at the end. Made me feel less intimidated to practice latte art with my sad cup of foam 😂
I followed step 1 & 2 to the letter and my milk still separated once. Could this be from the milk being too fresh or too old? I always thought fresher = better.
If it separates, try a quick re-whisk and tap technique to reincorporate. Not perfect but saves the drink.
I had weird separation with a carton that was still in date — turns out it was near the sell-by and had been warmed briefly in transport. Storage temp matters more than absolute freshness sometimes.
Fresh is usually better, but ultra-pasteurized milks (some shelf-stable ones) can be harder to froth. Also, very fresh straight-from-cow raw milk behaves differently. Check the label: homestyle/ultra-pasteurized vs. regular pasteurized matters.
Tried the handheld frother method and got cafe-level foam on my first try. Felt like a magician. A couple of small notes:
– Make sure the frother head is fully submerged at first, then lift slightly once foam forms.
– If you’re getting big bubbles, don’t panic; tapping and swirling fixes it.
Seriously, the guide is practical and not full of fluff (pun intended).
Polite reminder: clean the frother ASAP. Dried milk on the head is the worst to clean.
Great technique with the immersion depth — perfect for avoiding giant bubbles. Happy you got cafe-level results! 😄
This! The lift trick changed everything for me too. Also, hold the cup at an angle when pouring to preserve the microfoam.
Tried the French press method this morning. Result: 95% fluffy, 5% splatter on my counter haha. Pro tip: pull up slowly and tap the base to get out big bubbles before pouring. Also, the ‘refine the microfoam’ section is golden — didn’t realize swirling helps that much.
Same splatter problem here! I put a towel under the press and it saved my floor. Tapping is key, and swirl like you’re making a tiny tornado.
Haha towel under the press — brilliant. Also, using slightly chilled milk helps with more stable foam for me.
Great tip about tapping. For the splatter, pressing down a little slower and angling the spout can reduce the mess. Glad the refine step helped!
If you get big bubbles, a quick poke with a spoon (gently) can burst them. Not the most elegant, but effective.
Huge fan of the whisk method in the guide — cheap and fast. I do two rounds: quick whisk for big foam, then gentle hand swirl to get microfoam. One thing I’d add: use a metal bowl for heat retention.
Also — tiny typo in section 2: ‘temperture’ spelled wrong. 😅
Thanks for catching the typo, Priya — fixed! And yes, metal or glass bowls are best for even heating and retention. Appreciate the double-round tip.
Metal bowl + whisk = kitchen wins. I also use a smaller bowl to minimize airspace so foam forms faster.
Question: for non-dairy milks, the guide says oat is best, but what about almond? I tried almond and it totally collapsed after 30 seconds. Any hacks to stabilize it?
Barista almond milk worked way better for me. Also, make smaller batches — almond foam deflates faster, so pour immediately.
Almond tends to be unstable because of lower proteins. Try barista blends (they have added stabilizers) or add a tiny pinch of lecithin or soy lecithin syrup — it can help. Also, colder milk and a faster whisking method helps create foam that holds longer.
Constructive critique: the section on ‘Pick the Right Milk and Tools’ could mention water hardness for people using kettles to heat milk — minerals can slightly affect taste when milk scorches. Otherwise, super clear steps. Loved step 3’s method comparisons.
Nice detail — I never thought about the kettle water affecting milk. TIL.
Good point about water hardness — thanks, Michael. We’ll add a note about using filtered water when heating milk (especially in kettles) to avoid off-flavors and mineral buildup.